Remember how I wrote about why it’s a good idea to set up a separate email for outbound? Here’s a kind of a follow-up to that topic.
Before you start using a newly set up mailbox for serious outbound campaigns, it’s crucial to warm it up a bit. At Woodpecker, we often see that totally new email addresses used for outbound without any warm-up get blocked soon after an outbound campaign is fired off. Here’s more about why that happens and how to avoid it.
Check out the step-by-step plan on how to warm up your email address before starting a cold email campaign or see how you can do it automatically with the warm-up add-on.
What is email warm-up?
Email warm-up is how you build a good sender reputation and prepare a new email account for sending emails at scale. You do so by gradually increasing the number of emails you send from that account.
If you start sending huge volumes of email right away from a newly set up mailbox, your email provider will block you. They’ll do so ’cause that’s a typical spammer behavior. And even if your intentions were clean – it’s your actions that matter here.
First things first – take care of your domain reputation
Each freshly set up domain needs time to earn a good reputation
Ok, so once again: for IP/domain reputation safety reasons, we recommend setting up a new email address on a separate domain for outbound. And what we sometimes see our users do is set up a new domain, set up an email address on this domain, and start sending 50 emails a day automatically – within 3 days or so.
Unfortunately, that’s the best way to get blocked from sending by their email provider.
Here’s how it works
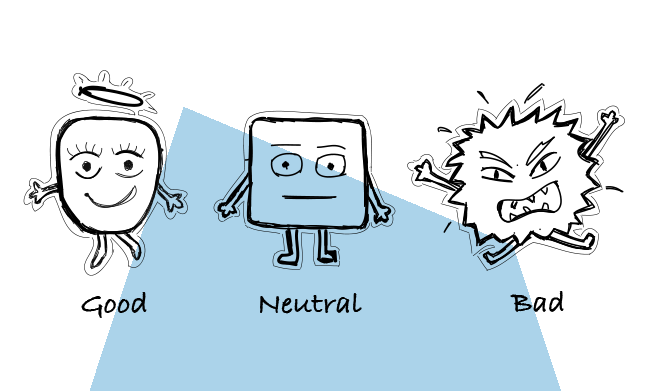
Each domain has a reputation. The reputation, good, neutral, or bad, can only be earned over time. Each new domain starts as neutral, but from starters, it is considered suspicious by its host.
If you start sending mass email automatically from an address on a new domain, you actually confirm your host’s suspicions that you may be a dangerous user, aka a spammer. If the host gets a signal like that, you might get blocked right away. So the key is to give yourself, and your brand new domain, some time to work on good reputation.
How much is “some time”?
That depends on the host of your domain. Various hosts require different periods of time to stop consider a new domain suspicious. They give you a few days or even weeks to gain their trust. The longer you work for a good reputation, the more they trust you.
Moreover, SpamAssassin, which is #1 anti-spam platform used by many hosts, marks as suspicious all messages coming from addresses on freshly set up domains (younger than 14 days).
That’s why, in a perfect scenario, you should send your email campaigns from an address set up on a domain that you’ve been already using for some time. And if you set up a new domain especially for outbound campaigns, you should give it at least 12 weeks before you start sending your first campaign. Moreover, you should use this time to slowly warm up your email address(es) set up in this domain. Read on to learn how to do that step by step.
More about warming up a domain, how long it takes and why we need that here: How to Warm Up My Domain Before Email Outreach >>
More about the reputation of your domain and email server IP:How to Check & Improve the Reputation of Your Domain and Email Server IP >>
And here’s a comparison of manual and automated email warm-up: Manual vs Automated Email Warm-up: Which Strategy Is Better for You? >>
Configure your email account
Set up an email account and learn about its capabilities
Make sure you set up an email account that will meet your sending requirements in the end. Different accounts from various email service providers offer different sending limits. You won’t get even close to the limits while warming up the account, but when you start sending outbound campaigns for real – this will matter. So think ahead and choose wisely.
Here you can check the limits from most popular email service providers:
What Are Email Sending Limits of Various Email Hosts? >>
Set up the from line and signature
Once your email account is set up, you should take some step to configure it properly. The first thing to do is to set up your from line and signature.
A crucial factor here is to make it right and real. Don’t make up random names and fake identities. Use your actual data. If you have a Gmail account, add a picture to your Google profile. You are a real person, so there’s no reason why you should make your email provider think you’re not.
If you use an HTML signature, make sure it’s properly created. That is, make sure the HTML of the signature won’t take more space of the email than the actual text of your message. The HTML of the signature should be neat and tidy. If you’re not sure how to check that, it’s better to use a text signature instead of HTML, because poorly written signature may actually get you into SPAM folders.
Set your SPF and DKIM records
If you don’t know what these are, read about it now:
What is SPF & DKIM? And Why You Want to Have It Set Up >>
Setting your SPF and DKIM will look a little different in each provider’s email account setting. You can look for some help materials on your provider’s page, or ask your provider’s support to help you out. If you’re using Woodpecker, you can ask our support for some guidance.
Either way, this is something which hugely affects your email deliverability, so you must not ignore it.
Send a few emails a day by hand
Once your email is set up, you can start warming it up – for starters, by hand. Collect a list of addresses you know for sure are existing. Think about your friends and business partners and treat it as an opportunity to reconnect with them. You won’t send them sales emails, of course. You will reach out to them personally. And you don’t need to use any automation at this initial point. It’s a good idea to start slow and simple.
A little pro tip here: in a perfect scenario, you want to collect a list of addresses set up on domains from various hosts, for instance, Gmail, Outlook/Exchange, GoDaddy, 1&1, Yahoo, AOL, Yandex. I know you can’t be sure which hosts are your friends and partners using but try to reach out to their business addresses, if possible. That’s how your new domain and email address will gain credence in the eyes of various hosts.
Write like a human
Pay attention to the content of your emails. It does matter what you send, so try not to send just anything to those addresses. Make them real messages, not just random pieces of text. If you don’t know what to write, you can even try to find some jokes or funny stories on the web and send them to your friends. Ask some questions in the emails, because you want your addressees to reply to your warm-up emails.
Collect a few responses and reply back
A regular mailbox is not just used for sending messages, but also for receiving them. Having that in mind, you want your new mailbox to get some replies. You can send some emails from your other addresses to that new one. And reply to them, too.
If your friends reply to you from their addresses hosted by various email service providers, that’s even better. Reply back to their replies, if possible. In a nutshell, the key is to just run some regular conversations via email using the newly set up email address before you start using it for automated cold email campaigns.
Set up a test campaign in Woodpecker
Wait at least 12 weeks, if your domain is fresh
When you send email from a domain you’ve just set up, you really need to work on it. It takes about 3 months for your domain to be properly warmed up and ready for email outreach. When you warm up an email address, you do part of the work of warming up a domain.
How to Warm Up My Domain Before Email Outreach >>
Prepare your email address for a first campaign
Take a few weeks to carry out the manual warm-up before you start using any kind of email sending automation. The time really matters. If you rush things up, you may ruin your reputation as a sender.
That’s a perfect time to work on your ICP, collect a well-targeted prospect base, work on a few versions of your email copy, and enrich your prospect base with some personalized snippets. So on the one hand, you work on your domain and IP reputation, and on the other hand, on the quality of your actual cold email campaigns. You’re getting ready to start your outbound on all fronts.
Set up a test campaign in Woodpecker
Once you’ve done the manual warm-up, you can set up a first automated test campaign in Woodpecker. You won’t need more than 10-20 trusted email addresses to fire this off. Make sure the addresses are valid – ideally they should be some addresses of your friends and colleagues, so that you can ask them to send a reply to you.
And another pro tip: as your first prospect on the list, add a test email address from Mail-Tester. It’s a tool that will allow you to easily assess the quality of your email copy, and verify the correctness of your email account settings. I wrote a bit about the tool in this post.
At this point, you will already have a version of the actual copy you are going to send to your prospects in a real campaign. Test it here. Don’t just send anything, like a single word “test” (that’s what I used to do, because it was quick – which is why I mention it here). Mail-Tester will show you an assessment of your email copy, so get the assessment of the actual copy you are going to use in your campaign.
And one more thing: don’t get impatient once you hit ‘Send’ in Woodpecker. The emails need time to get sent because they are not sent all at once. That would negatively affect your deliverability rates in the long run. The best idea is to actually set quite long time intervals for the emails to be sent. We call them ‘windows’. If you try to pack too many messages into one window, your mailbox activity will be characterized by some peaks. It’s like you don’t send anything, and suddenly you want to send too many messages.
And trust me, you really want to avoid those peaks. Below I explain how it works.
Don’t send too many at once
You may have heard about “the best hours to send business emails”. Here’s what I think about it.
If you try to fit into the golden days and hours, you may end up sending too many emails for very short periods of time. If your mailbox tries to push numerous messages at certain times and is totally inactive at other times, this may be treated as an anomaly by your email service provider. Such anomalies may be a reason for your provider to block your mailbox from sending anything.
Check out and compare the two graphs below.
The first one is what email service providers don’t like and get suspicious about. Your mailbox activity looks like this when you try to send all your campaigns during a two-hour-or-so time period one day, and you’re not sending anything at all on other days.

The second one is what looks normal to email service providers. This is, more or less, how your mailbox activity looks like when you don’t try to squeeze too many messages into the best days and hours, but you send them steadily.

Ok, sending cold emails you probably won’t be able to send a very similar amount every day. What you can do, however, is to try to send the emails more steadily by giving Woodpecker more time to send a batch of emails.
So instead of setting your delivery hours like this:
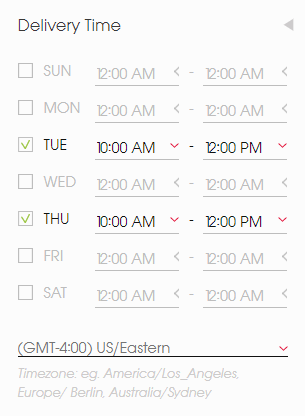
you can set them up like that:
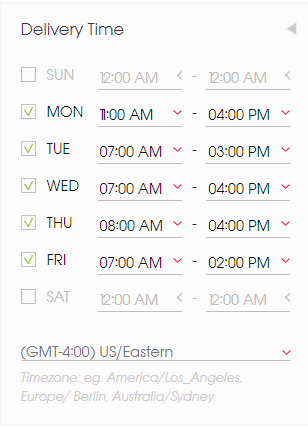
And whether you’re just sending a test campaign or a real cold email campaign, remember that 50 opening emails a day is enough. It is. Especially if you have planned a few follow-ups – because the opening messages and the follow-ups will overlap after a few days. And if you planned as many as 7 follow-ups, one day you may exceed your daily sending limits and get blocked.
What after the warm-up part?
Only after a well-performed warm-up, your email address on a separate domain will be ready to send cold email campaigns fluently without any disturbances. Of course, the quality of your messages and your prospect base, the delivery time settings, and the volume of your campaigns are the factors that you’ll need to take care of continually and keep an eye on all the time – not just during the warm-up period.
The activity of your mailbox is constantly monitored by your email service provider. If you try to rush things up or take some shortcuts, you may be punished by poor sender reputation and thus poor deliverability.
So take your time to warm up your email address and create a personalized campaign that you will be able to send smoothly with confidence that it will get to your prospects’ mailboxes. Or pick a reliable warm-up tool that will do it for you.
Hope this helps! Next time, I’ll write about how to set up a cold email campaign in Woodpecker to make sure it will freely go out and get delivered to its destination. Stay tuned.
FAQ Section
1. What is the purpose of an email warm-up, and how does it impact sender reputation?
The purpose of an email warm-up is to gradually increase the volume of emails sent from a new or infrequently used email account to build a positive sender reputation with email service providers. This process helps ensure that emails are more likely to land in the recipient’s primary inbox rather than being flagged by spam filters. By demonstrating consistent and responsible email behavior, an email warm-up enhances email deliverability and establishes trust with mailbox providers, reducing the chances of future emails being directed to the spam folder.
2. How can using an email warm-up tool improve inbox placement for cold emails?
Using an email warm-up tool can significantly improve inbox placement for cold emails by automating the process of gradually sending emails and engaging with received emails to mimic natural email activity. These tools often interact with emails in the warmup inbox, such as opening, replying to, and marking emails as important, which signals to email service providers like Hotmail that the sender is legitimate. This established credibility helps avoid spam filters, ensuring that subsequent cold emails have a better chance of reaching the primary inbox of potential leads.
3. What are the key features to look for in an email warmup tool to enhance email deliverability and avoid the spam folder?
Key features to look for in an email warmup tool include the ability to gradually increase email volume over time, simulate realistic email interactions (opening, replying, and marking emails as important), and provide detailed analytics on email deliverability and sender reputation. Additionally, the tool should support various email service providers and offer customization options to tailor the warm-up process according to the specific needs of the sender’s email account. These features collectively help enhance email deliverability and minimize the risk of emails landing in the spam folder.
4. Can email warm-up practices benefit a Hotmail account specifically, and are there unique considerations for this email service provider?
Email warm-up practices can benefit a Hotmail account by improving the account’s sender reputation with Microsoft’s email servers, ensuring better email deliverability. While the general principles of email warm-up apply across email service providers, Hotmail accounts may require close attention to sending limits and the rate of increase in email volume, as Microsoft may have specific thresholds for spam detection. Adhering to these considerations and using an email warmup tool that accommodates Hotmail’s protocols can lead to more successful email campaigns targeted at recipients with Hotmail accounts.
5. What strategies can be employed alongside using an email warmup tool to maintain a positive sender reputation and ensure ongoing email deliverability?
Strategies to employ alongside using an email warmup tool include maintaining a clean email list by regularly removing inactive or unengaged subscribers, segmenting the email list to send targeted and relevant content, and adhering to best practices for email content to avoid triggering spam filters. Additionally, actively managing bounce rates, encouraging recipients to whitelist the sender’s email address, and periodically reviewing email engagement metrics are crucial for sustaining a positive sender reputation and ensuring ongoing email deliverability.
READ ALSO
How to Check & Improve Your Domain and Email Server IP Reputation?
I bet you want your emails to get to your ideal prospects' inboxes. To make sure they will, you need to take care of your deliverability. Among many factors that affect the deliverability, the reputation of your domain and your email server IP plays a tremendous role. Do you know what actually affects the reputation? Do you know how to check the reputation, control it, or improve it? Read on to find some answers and helpful tools.

4 Things You Need To Know When Choosing An Email Provider
There are a couple of things you need to pay attention to before you set up a separate email account for outbound. But first, what are the services that offer email accounts? The most popular email host among our users is Gmail. Then, we tend to spot accounts at Outlook, Zoho and GoDaddy. But you can also set up an account at Yahoo! Mail, AOL Mail, ProtonMail, Rackspace, and the like.
Why We Set up a Separate Mailbox for Outbound Campaigns?
When we were getting about sending our own cold email campaigns, the first thing we did was setting up a new mailbox for each of our sales persons. Those new email accounts have been created on a separate domain and dedicated exclusively to outbound email campaigns. Why did we do that? And how can you do that quickly and conveniently for your own outreach?

