
Sending an automated cold email campaign is just a start. In the end, you want your emails to actually get to your prospects’ inboxes. And to make that happen, it’s crucial that you properly plan and set up your cold email campaign in every detail. I wrote this post in cooperation with our Support team and our Head of Integration & Deliverability, because we observed that many of our users still need help when it comes to properly adjusting their cold email campaign settings.
So, we proudly present the step-by-step guide to setting up an automated cold email sequence in Woodpecker that will smoothly go out of your mailbox and actually get to your prospects.
How to use this post?
I really want you to know all the basics, as well as all the nuances, that we’ve learned so far about cold email deliverability. If you follow some rules, your email campaigns will fluently go out from your mailbox without any interruptions, and they will reach their destination.
To make things easier, let’s organize the whole campaign setup process into 4 layers. You can jump to each of the layers by clicking on the links below. But if you’re reading this post for the first time, I recommend reading the whole of it, layer by layer.
So, we’ve got:
Email configuration
Step 1: Create an email address on a separate domain
Why do we recommend that? In a nutshell, by using an address on your main domain you put at risk the reputation of your company website and all email addresses set up on this domain.
And because in cold email you’ll experiment a lot, a much safer solution is to set up a new domain, which name will be similar to the main one, but which will be reserved for outbound campaigns, and thus totally under your control.
Read more on Why We Set up a Separate Mailbox for Outbound Campaigns? >>
One crucial thing to keep in mind, however, is that an email address on a newly setup domain should not be used for outbound campaigns immediately! The new domain needs time to gain good reputation (at least 3 weeks), and the email address needs to be properly warmed-up.
Learn here How to Properly Warm Up Your Email Address for Outbound >>
Step 2: Set up your SPF & DKIM records
Firstly, if you’re not sure what SPF and DKIM are, check out my explanation in the simplest words possible:
What is SPF & DKIM? And Why You Want to Have It Set Up >>
Secondly, here’s a great tool from mail-tester.com to check your current SPF and DKIM records:
Check your SPF and DKIM keys >>
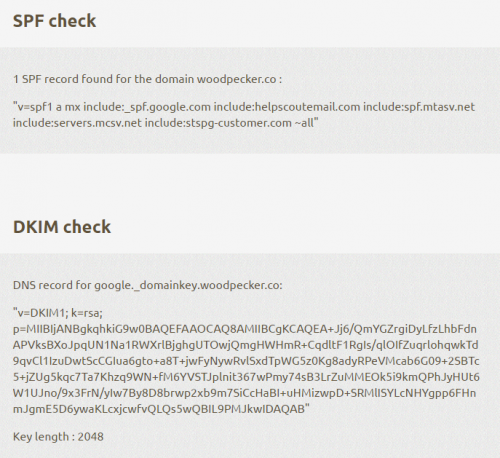
If your SPF and DKIM records are set up, your results will look somewhat like this:
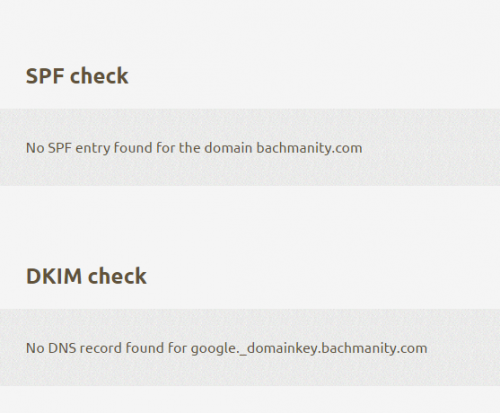
But if your results look like this, however, it’s a sign you should set up your SPF and DKIM:
The process of setting up those two records will look a little different for various email service providers. The best practice is to look for some help docs from your email host, or if you can’t find any articles on the web, contacting your email host’s support.
Here are some helpful links if you use:
- Gmail (G Suite): Configure SPF records to work with G Suite >>
- Outlook (Office 365): How Office 365 uses Sender Policy Framework (SPF) >>
- Zoho Mail: Configure SPF Records for Zoho Mail >>
- GoDaddy: Add an SPF record >>
- 1and1: SPF & DKIM Records Setup For 1and1 >>
Step 3: Set up your from line and personal data
It’s crucial that you use your real personal data as a sender. Don’t come up with fake identities for cold email campaigns. Your identity as a sender will also affect the deliverability of your emails.
#1) Set up a from line that will be adequate to the purpose of your email campaign. Here’s more about that:
What Should Be the From Line of My Cold Email? >>
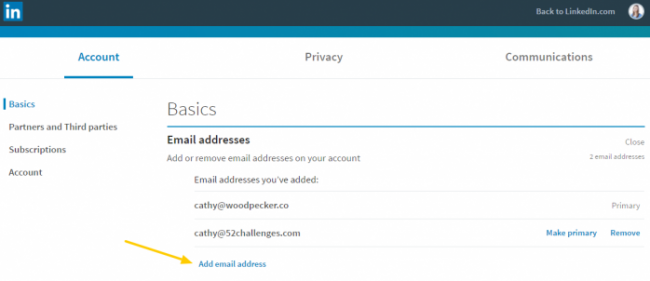
#2) Add the email address to your alternative email addresses on LinkedIn. This will allow your prospects validate your identity as a sender (especially if they use Google mail and a plugin like Rapportive). To do that, log in to your profile on LinkedIn, and go to Me ->Account-> Settings & Privacy -> Email addresses -> Add new address.
#3) Another thing you can do if you use Google mail is to fill out the data within your Google Account, and add your pic.
Step 4: Warm up the outbound email address
Remember that before you start sending an actual campaign from Woodpecker, the email address you want to use for sending should be well warmed-up.
You really don’t want to skip this one! Especially if the domain you use for outbound is brand new. Before you start automating your email campaigns, you need to build a good reputation for your domain and use the email address manually for a while. Here’s how:
How to Properly Warm Up Your Email Address for Outbound >>
Prospect base
Step 5: Collect quality prospects
While you’re working on your email configuration, your domain reputation, and your email address warm-up, you can start collecting prospects.
Keep in mind that the quality of your prospect base affects your deliverability rate to a very significant extent. There are two aspects you need to consider in this respect:
#1) Know who your prospects actually are. If you send your emails to people who are not interested in your offer, they can mark your message as spam. This doesn’t mean your offer is bad. It may just not be a good fit for the prospects you chose to contact.
According to ReturnPath, even if as little as 0.1% of your recipients manually mark your message as spam in their inbox, your emails will stop being delivered and you may land on a spam list. That’s just 1 angry prospect per 1000 messages sent (!). Now you should get why I always write about quality over quantity, personalization, and careful targeting.
If you’re still not sure who you want to send your messages to, check out this post for a little help:
What’s the First Step to Building a Good Prospect Base? >>
#2) Make sure the data you collect is valid, especially the email addresses – which leads us to the next step.
Step 6: Make sure your prospects’ addresses are valid
Woodpecker has a built-in system for validating email addresses before it actually sends your emails. But the system cannot possibly catch all invalid email addresses in your prospect base. If an email is sent to a non-existent address, it bounces. And if your email provider notices that many of the emails you send get bounced, they may stop delivering your emails without any notice or they may block you from sending anything.
Actually, according to Validity (formerly ReturnPath), if as little as 2-10% of your emails get bounced back, in other words, if for every 100 emails 2-10 get bounced, then your emails may stop being delivered.
What’s more, if your prospect base includes some poor quality, unverified data, some of your emails may be sent into so-called spam traps, which are actually valid email addresses that used to belong to people, but they don’t anymore, so they’ve been taken over by companies fighting spam. Needless to say, if your emails get there, the companies have a reason to suspect you’re a spammer, which, in turn, may spoil your sender reputation.
To double-check if your prospects’ emails are valid, you can use tools like Hunter’s email verifier before you import your prospect list to Woodpecker.
Step 7: Divide your prospect list into smaller campaigns
This one’s important. First of all, you don’t have to buy or collect a prospect base with thousands of records to start a cold email campaign.
For the record, buying a huge contact list is far from a good idea, anyway. Check why in this post: 3 Ways to Get a Quality Outbound Prospect List >>
To begin with, it’s better to have a list of 20 contacts to companies you want to do business with and start small. This approach will allow you to prepare a better email copy, and actually initiate some valuable business relations, instead of shooting generic leaflets at hundreds of companies you have no idea about. You can test your email copy and settings on small prospect lists and improve them time after time.
Create small, well-targeted campaigns
Actually, we’ve found out that the most successful cold email campaigns run through Woodpecker have no more than 150-200 prospects. Huge campaigns with hundreds and thousands of prospects get clogged up and show low open and reply rates.
The smaller the prospect list within a particular campaign, the more opportunities you have to diversify your email copy and settings. I’d say a campaign with 20-50 prospects is perfect for testing, because it allows you to keep a good level of customization and personalization.
There’s one more thing to that. Let’s say one of your cold email experiments turns out to be a bummer. Would you prefer to have the bummer sent to thousands of prospects or to 20 prospects? I’d choose the latter option, because it would be easier to make up for this mistake.
In the opposite scenario, if such a small campaign works great, you can add some new prospects to it, but try not to go for more than 200 prospects per campaign.
Email copy
Step 8: Avoid sending similar messages to hundreds of prospects
If you send the same or very similar email copy to numerous addressees, you look suspicious to your email provider and anti-spam systems. As a result, you may get blocked after sending just a few dozens of such similar messages. Here are a couple ideas to avoid that:
#1) Personalize your emails. If you enrich your prospect list with some higher-level personalization snippets, each of your emails will be unique, even though you use the same template. Check out those two posts to learn how to do that:
How Does Personalization Affect Cold Email Deliverability? >>
What Should Go First: Cold Email Copy or Prospect Base? >>
#2) Prepare alternative versions of a copy and divide your prospect list into smaller segments. Create a separate, smaller campaign for each segment, and set up a different copy for each campaign. You can customize the copy based on some characteristics of the chosen segment in your prospect base. This way, you’ll be sending only a limited number of similar emails.
#3) Use A/B tests to create various versions of your email. A/B testing not only allows you to discover which version of email copy gets better results but also has a positive impact on deliverability as the messages are more diversified. As a result, your emails look less suspicious to SPAM filters.
Step 9: Avoid spam words
There are some words used again and again in spammy emails. Anti-spam systems get alarmed by those words and block messages which include them. The thing is, those are not really uncommon words or phrases, so you need to be really careful when writing your copy. Check out two lists of such words here:
- The Ultimate List of SPAM Trigger Words by Hubspot >>
by Karen Rubin
Step 10: Don’t use too many pictures or HTML
Cold email is supposed to look like an email that you would send to a friend. It doesn’t need fancy HTML templates, fonts or pics. If there’s too many pics, or too much HTML in comparison to text, such an email sent at scale looks suspicious, and its deliverability may be decreased. Check out these posts for more information on dos and don’ts of cold email content:
What’s the Difference Between Cold Emails and Marketing Emails? >>
Fonts, Pics & Links in Cold Email – Should We Ever Use Them? >>
Attachments in Cold Email: Should We Ever Use Them? >>
Sending settings
Once your prospect base and email copy are ready, you can get about your sending settings. This is another crucial factor in terms of deliverability. If you don’t pay enough attention to setting things right, your perfectly selected prospects may never see your well-thought-out messages. Here’s what to do.
Step 11: Learn about the sending limits of your email provider
Each email provider has a list of daily, and sometimes even hourly, limits for sent and received messages. I wrote a separate post about that, where I also made a little collection of resources provided by the most popular email hosts. Check the limits here:
What Are Email Sending Limits of Various Email Hosts? >>
A little pro tip about G Suite: We’ve found out that during the 30-day trial period and over the first 180 days of your premium subscription on G Suite, you have the same daily limit as on free Gmail (500 messages sent a day). But there’s a way to go for the higher limits sooner. Right after you buy your G Suite account, you can make a pre-payment for $30 or more, which will unlock your proper G Suite limits after 48 hours.
Step 12: Set the right number of opening emails and follow-ups
Follow-ups are a must. According to our system’s aggregated data, follow-ups increase the reply rate of cold email campaigns. The ability to automate your follow-ups is an opportunity you shouldn’t ignore. But the sending schedule of your follow-ups should be well-thought-out.
You need to keep in mind your host’s sending limits while planning when to send all your emails. You also need to remember, that if you will try to send numerous campaigns from the same mailbox, it might get clogged up pretty soon.
The main rules to stick to, are:
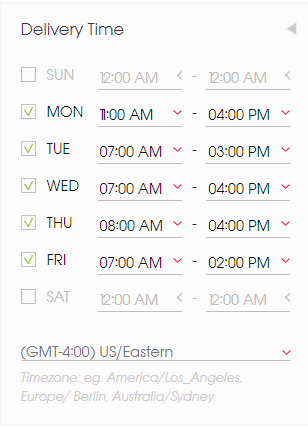
#1) Adjust the time you need to send all the planned messages to the number of messages you want to send. The more messages you want to send a day, the wider the “windows” for sending them should be (for instance, 9 AM – 4PM instead of 9AM – 11AM).
#2) Avoid scheduling all of your campaigns and messages for Tuesdays and Thursdays between 10 AM and 12 PM. To have your campaign sent smoothly without any bottlenecks, you need to avoid sending peaks. I wrote more about it here.
So it’s better to have your emails sent from Monday till Friday and give them a few hours to get sent fluently without unnecessary rush.
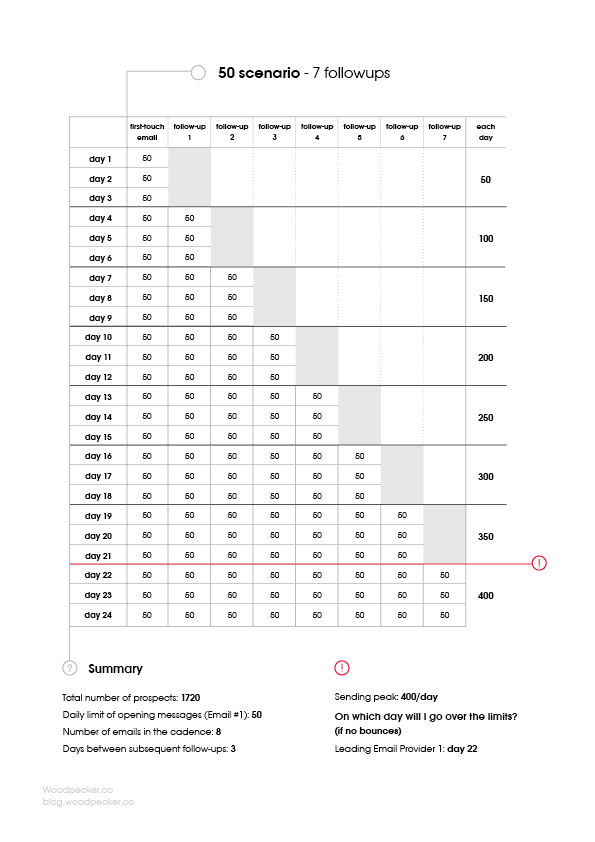
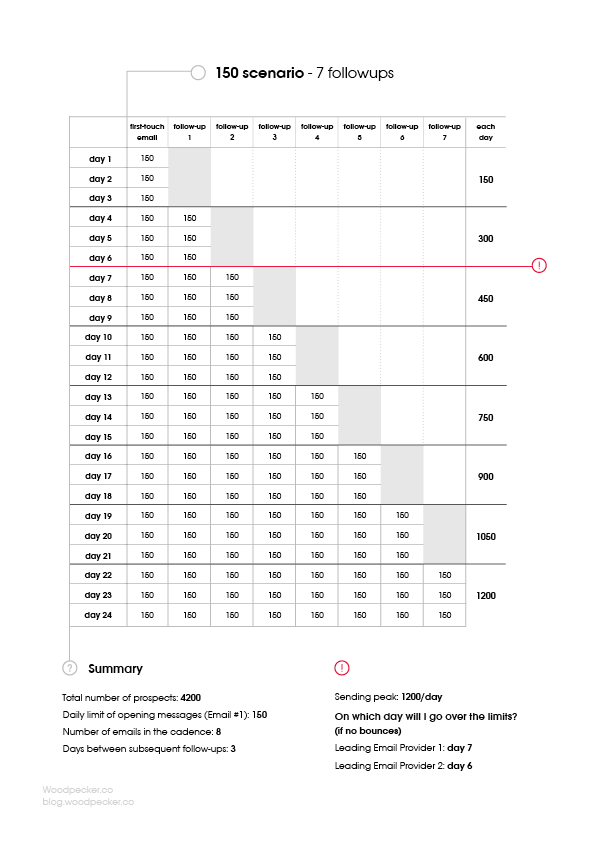
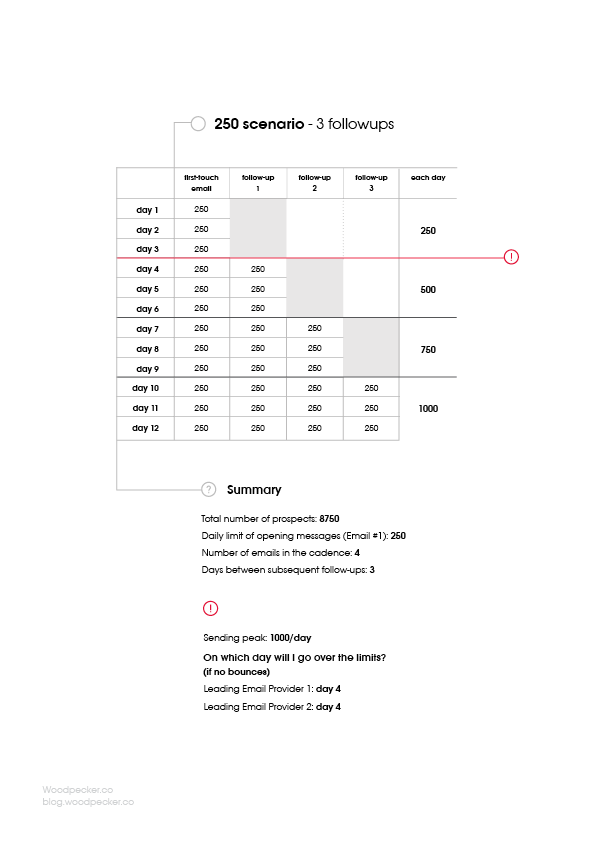
#3) If you have a lot of messages to send (numerous prospects and campaigns with multiple follow-ups) you should schedule a smaller number of messages to be sent a day. We’ve prepared a few tables presenting various sending simulation scenarios. They are meant to help you predict on which day of your campaign you may accidentally exceed your email host’s sending limits.
Mind you that in these tables we didn’t consider any replies (if a prospect replies to you, Woodpecker automatically stops sending the subsequent follow-ups planned for this person). So in fact, the number of follow-ups planned to be sent will decrease as your recipients reply to you. But regardless of that, it’s safe to use those tables as a helpful resource when scheduling the daily number of opening emails to be sent, in regard to the number of follow-ups your campaign includes.
The golden rule here would be: the more follow-ups you planned for a campaign, the fewer first-touch emails a day you should schedule.
Check out those scenarios to better see what I mean:
A. We want to send 50 emails a day and we have an opening email and 7 follow-ups to send.
B. We want to send 150 emails a day and we have an opening email and 3 follow-ups to send.

C. We want to send 150 emails a day and we have an opening email and 7 follow-ups to send.
B. We want to send 250 emails a day and we have an opening email and 3 follow-ups to send.
What do you think about those scenarios? Comment below.
#4) Avoid sending too many campaigns from the same email address. You may have several campaigns with such a number of emails that will cause a risk of exceeding your sending limits once follow-ups start to overlap. In such a case, it’s always safer to connect another email address to Woodpecker and divide the campaigns between the two (or more) email addresses.
#5) Avoid sending all follow-ups on the same days of the week. If you set up all your follow-ups on Wednesdays, or Tuesdays, or any other day of the week, you won’t be able to avoid the sending peaks. Give the follow-ups a chance to be sent after a set amount of time, and not only on a chosen day of the week. Read more about scheduling follow-ups here:
Follow-up Emails: How Many & How Often? >>
Phew, that’s a lot to embrace, isn’t it? Actually, if you’re just starting with Woodpecker, we recommend setting up just one email campaign with no more than 50 opening emails planned to be sent daily, and 2-3 follow-ups.
Still have questions about email deliverability? Check out this post where we answered the most pressing deliverability questions asked by our clients >>
What’s in it for you?
All of it. Keep it in mind and use regularly.
I wanted to make the guide as practical as possible. I hope you’ll take at least some of the advice squeezed into this post and use it when setting up your campaigns in Woodpecker.