
Nifty cold emails work. Nifty cold emails with follow-up work miracles. But the sending cold emails by hand sucks because it takes way too much time. That’s not a made-up marketing scenario. That’s life. And if you’ve ever been sending your cold emails manually, you know that.
We created Woodpecker because we had been sending our cold emails by hand and it was a problem we needed to solve. Now you can use our solution to fix it up for yourself. Here’s how to set up a cold email campaign in Woodpecker to automate outreach in a few simple steps.
How to get your Woodpecker account?
If you want to try this out, first you need your login and password. You can sign up here >>
Next, log in at app.woodpecker.co. Once you log in for the first time, you’ll see your first cold email campaign – as we call it in Woodpecker. Each campaign involves information on:
- what to send,
- where from and when to send it,
- who to send it to.
Here’s how you set up all those info for your campaign step by step:
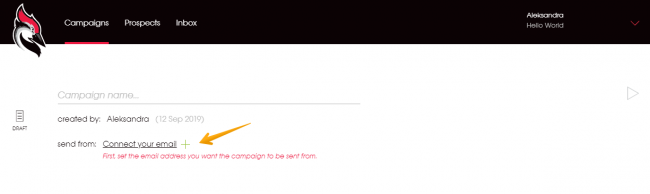
Step 1: Connect your email to Woodpecker
Woodpecker doesn’t use any extra servers to send your emails (as opposed to MailChimp, for instance). It uses your own email servers, which is why the first thing to do is to connect your mailbox with your Woodpecker account.
Read: How Woodpecker Sends Your Emails and Follow-ups >>
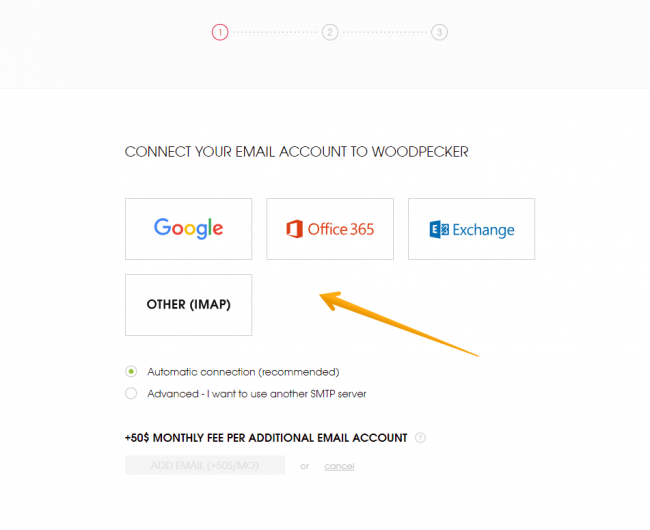
To do that, click the ‘Connect your email’ and follow the next steps of integration.
Whether you use Google Apps or an IMAP account based on your own server, Woodpecker will be able to integrate with your mailbox. Just choose the type of email account you’re using.
You can also opt for advanced integration in which you can use an external SMTP from Mailgun or SendGrid with Woodpecker. Wondering whether you need an external SMTP for?
Check out this guide: External SMTP for Cold Emails – Can It Improve My Deliverability? >>
 When you connect your email address to Woodpecker, time for more settings. Set your ‘From’ line and your signature. Do it now, or set it up later in Settings.
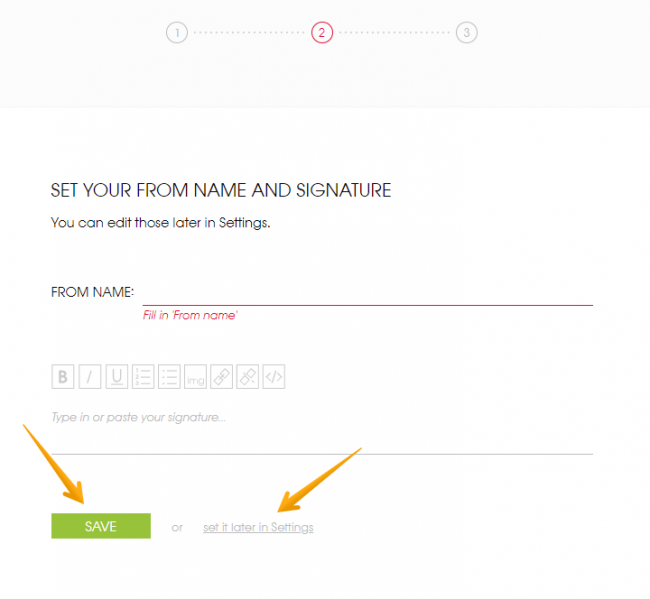
Next, click ‘Continue’ and wait a few seconds to let Woodpecker complete the integration.
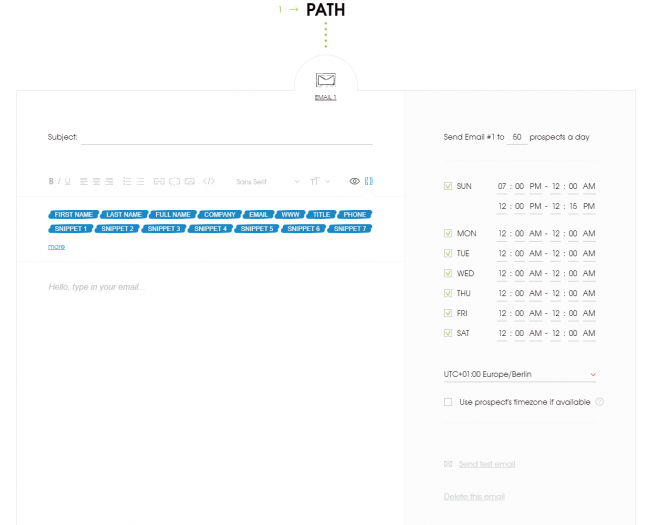
Step 2: Create a personalized email sequence
Campaign creation is divided into 3 parts:
- PATH – this is where you create a sequence of emails for your campaign.
- PROSPECTS – here you import and add your recipients to the campaign.
- SEND – preview and send or save the campaign. Here you can also send a test email.
Create your first message in the Path – an opening email.
IMPORTANT:
- If you want to copy and paste the message, first paste it into a program like Notepad or textEdit (set on plain text) and copy the plain text from there to Woodpecker, to get rid of formatting used by text editors like Microsoft Word, Pages or Google Docs.
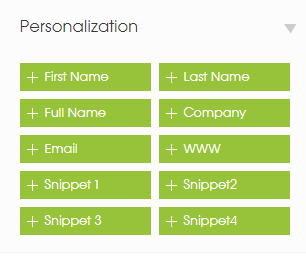
- Always use the blue personalization buttons on top to put in custom fields like {{First name}}, {{Company}} etc. into your message.

By following the two rules above, you make sure your emails will render properly in your prospect’s email client and that they will look safe and natural.
To add a follow-up message, click ‘Add email’ underneath.

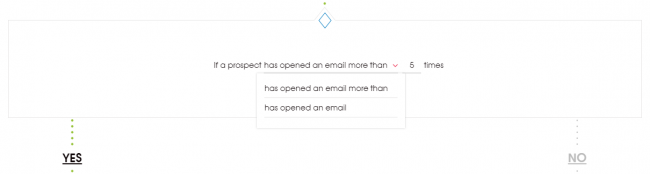
Here’s where your campaign Path may split into Path YES and Path NO if you decide to add a Condition. The Condition defines a prospect’s action that determines what message should be sent next.

For example, if you set your Condition to “If a prospect has opened an email more than 5 times”, you can create one follow-up that will be sent when the answer is YES (that is, the Condition has been met), and the other one that will be sent when the answer is NO (so the Condition hasn’t been met).
You can create up to 12 messages in a sequence within a single campaign (an opening email plus up to 11 follow-ups). When creating a follow-up copy, make sure you follow the two important rules I mentioned above.
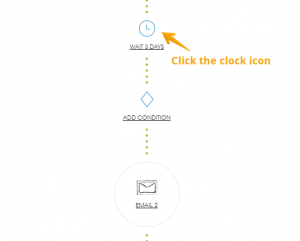
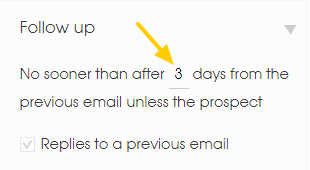
You can also set up a time gap between your opening email and a follow-up. That’s a number of days, or hours, that needs to pass after sending the previous email for Woodpecker to send a follow-up. By default, it’s set up to 3 days, but you can change it by clicking the clock icon.
Step 3: Set up daily limits & delivery times
Each of the messages in the sequence has its own delivery time settings on the right.
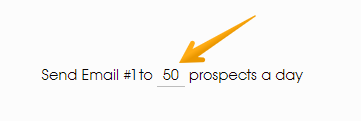
For the opening email, set the maximum of messages you want to be sent a day: the default is 50 opening emails a day, but you may want to send fewer than that or more than that (up to 150). That depends on you, but remember that you’re sending the messages from your own mailbox and there are some limits established by your email provider which you have to respect if you want to avoid being blacklisted.
Hint: 150 messages a day may seem not so many, but remember that in a few weeks, you may have some follow-ups to send on the same day. And if you set up 11 follow-ups, that means one day 150 x 12 = 1800 emails will be scheduled to be sent from your email address on the same day. And that is many emails.
Focus on the quality of your outreach, not on its quantity.
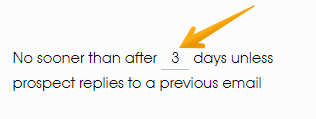
For each of your follow-ups, set up the number of days after which you want the follow-up to be sent.
 Then, for each of your emails – both the opening email and follow-ups you can:
 - set up the days of the week and the time windows when you want your messages to be sent,
- choose the timezone appropriate for your prospects manually or have it detected automatically by Woodpecker.
You can choose up to three time windows a day when your emails will be sent out. To add a time slot you need to click the ‘+’ symbol right next to the day of the week name.
If you don’t want any emails to be sent on weekends, untick Sat and Sun in the delivery time settings. If you want to send your emails before noon, set the time frame at e.g. 7AM – 11AM.
To schedule your messages to be sent in your prospect’s timezone tick the “Use prospect’s timezone if available” box. Woodpecker will then detect a prospect’s timezone based on their country.
Here’s more how your messages will be sent from Woodpecker >>
Step 4: Add prospects to your campaign
As you scroll down below the messages, you’ll see the Prospects section. You can add prospects to your campaign in three ways:
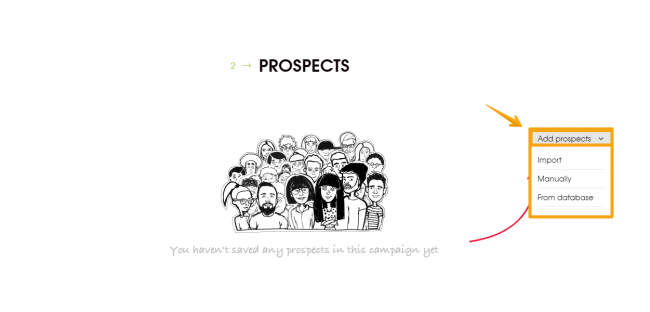
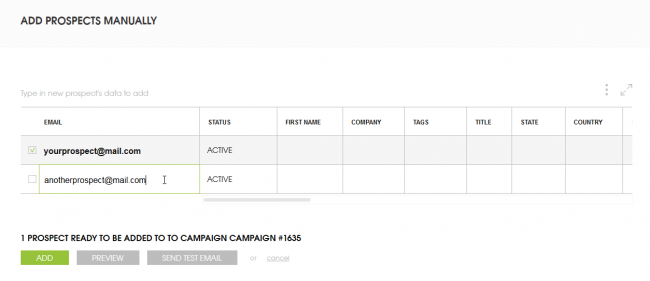
a) Type in their data manually – if you have just a few prospects to add:
- Click ‘Add prospect’ on the right above the prospects spreadsheet.
- You’ll see that the first field in the spreadsheet is ready to be filled manually.
- Type in the prospect’s email address (required).
- Use Tab to go on to the next editable field in the spreadsheet (First name, Last name, etc.)
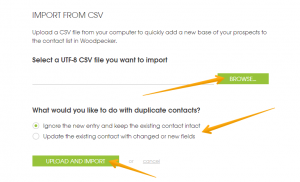
b) Import their data from a CSV, XLS or XLSX file – if you have more prospects to add at once:
- Make sure you have a properly prepared spreadsheet, that has been saved as UTF-8 encoded CSV including the data you want to use as personalization custom fields in your emails, for instance:

- Click ‘Import prospects’ on the right above the prospects spreadsheet.
- Choose the previously prepared file.
- Decide if Woodpecker should update the duplicates or ignore them (don’t worry about that when you import your first contact base).
- Click ‘Upload and import’.
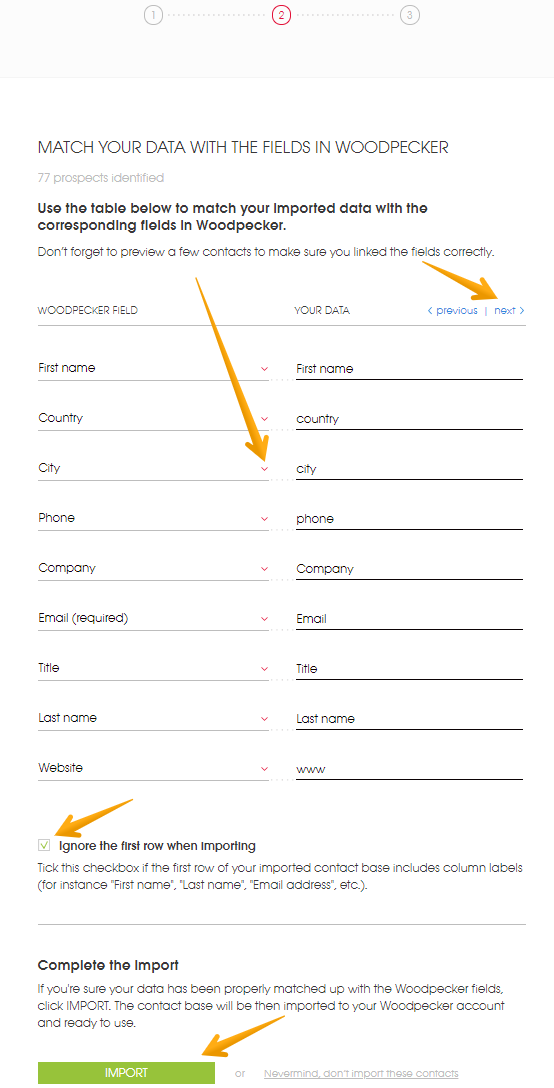
- Woodpecker will ask you to match the columns in your file to the columns in the prospects spreadsheet. Email will be recognized automatically, but please remember to match the rest yourself. The unmatched fields will not be imported.
- As you match the fields, click the blue ‘next>’ button to preview some data from your file.
- If your spreadsheet involves labels in the first row, tick the checkbox at the bottom to ignore the first row.
- Click the green ‘Import’ button.

As you have some prospects typed in or imported from a file, tick those prospects who you want to send the emails from this campaign.
- You can tick them one by one,
- or use the ‘Select all’ button to tick all on the page,
- or click ‘Select all’ once again to mark all filtered prospects on all pages.
c)Add prospects from your existing database in Woodpecker
Click “add prospects” and then choose “From database”. Select prospects that already exist in your database, and click “Add” to add them to your campaign.
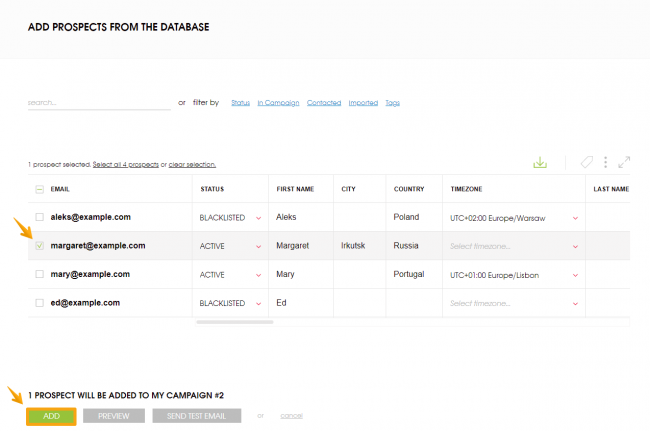
Please remember that you can filter your prospects by Status, Campaign they are in, Contacted (YES/NO), the file they were Imported from, or by Tags.
d) Import prospects directly from Google Sheets
You can move prospects from Google Sheets to your Woodpecker database or directly to a chosen campaign:
To do that you need to enable this integration in the Integrations tab inside the app and connect your Google Drive to Woodpecker. Here’s how to do it step by step >>
Step 5: Preview and send the campaign
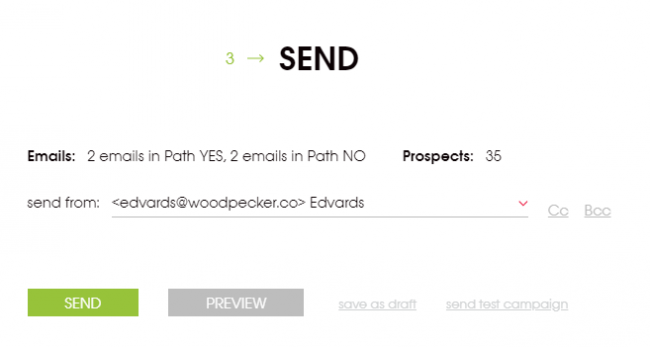
Before we send any emails, we usually want to check if everything looks as it should. There are two ways to preview the campaign before sending it.
Click ‘preview’ to see emails in both Paths.
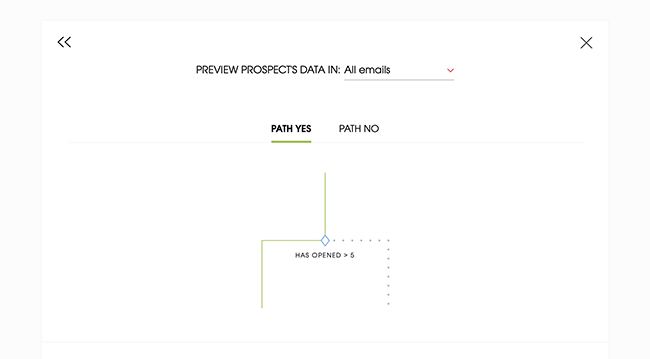
When Path YES is underlined in green and also marked in the outline, you will see emails from this path only. The blue rectangle symbolizes the Condition. Similarly, when you click ‘Path NO’ you’ll see emails from this path. It should be underlined in blue and marked in the outline. Below the outline, you can see a preview of your opening email and all the follow-ups in both Paths.
You can also preview your campaign by sending a test campaign. If you click ‘Send test campaign’, Woodpecker will send the whole sequence at once to your own email address, so you could check how the emails render in your email client.
If everything looks ok, you can click the green ‘Save and send’ button to start sending the campaign (it will be sent according to delivery times settings, of course).
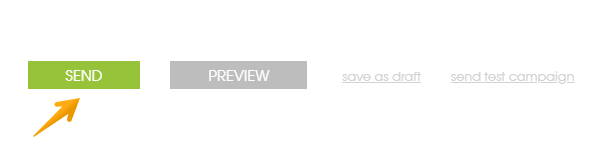
Or if you want to save it without starting yet, just click ‘Save as draft’.
You will be able to view and edit all saved campaigns on your list of Campaigns in Woodpecker.
***
So that’s how to set up your cold email campaign in Woodpecker. That’s the first part of our quickstart guide. You can do much more afterward when your campaigns are already running. See how to use campaign stats and how to access particular prospects’ engagement, Part 2: Woodpecker.co Quickstart Guide: How to use cold email stats >>