
So you’ve taken your first step – you’ve set your campaign and now it’s up and running. Now you can take step two – control your campaign statistics and improve your emails on the basis of real-time data. Here’s how to use Woodpecker stats to the fullest and why the stats are so important for your cold email outreach.
Where you can check stats in Woodpecker
In Woodpecker panel, there are 3 places where you can control statistics of your campaigns and particular messages.
1. List of campaigns
The list of campaigns is the first view you see after logging in to your Woodpecker account.
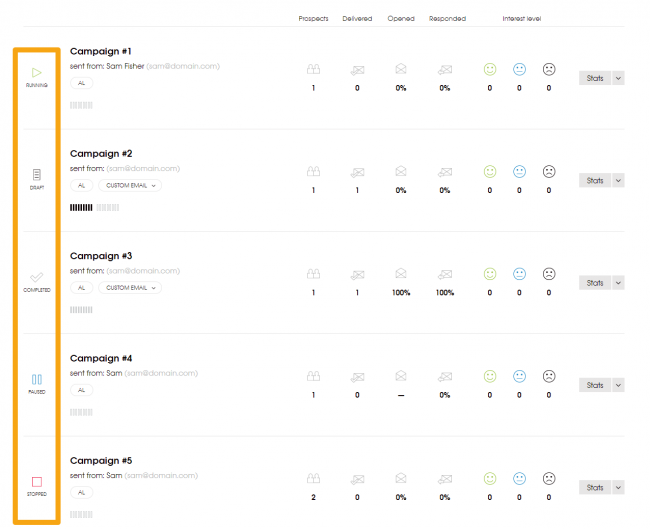
As highlighted in the screenshot above, here, on the left-hand side, you can check campaign status: running, draft, completed, paused or stopped.
Here you can also get a quick preview of each campaign’s stats. In this view, you can check:
- how many prospects have been added to the campaign (PROSPECTS),
- how many prospects got your message (DELIVERED),
- most importantly: how many prospects opened (OPENED) and replied (RESPONDED),
- prospects’ interest level.
This is the easiest way to compare the effectiveness of two campaigns in terms of A/B testing. At first sight, you’ll be able to tell that Campaign A is bringing you more replies than Campaign B. Looking for reasons, you can click the campaign’s name to access more details in the Campaign overview.
The Campaign overview involves 3 tabs:
- Stats
- Prospects
- To Check
2. Campaign overview – Stats tab
The first tab presents statistics of the whole campaign, as well as the statistics of each message in both Paths.
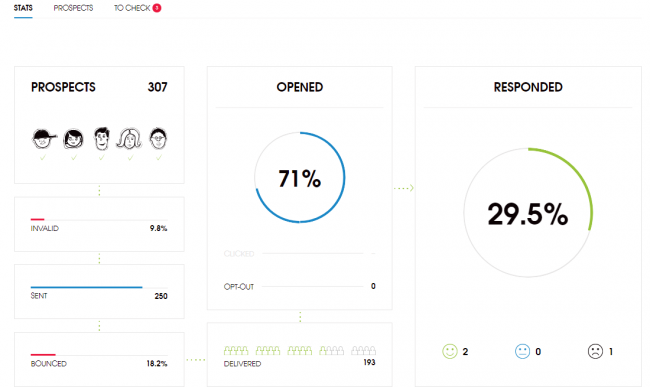
Campaign stats
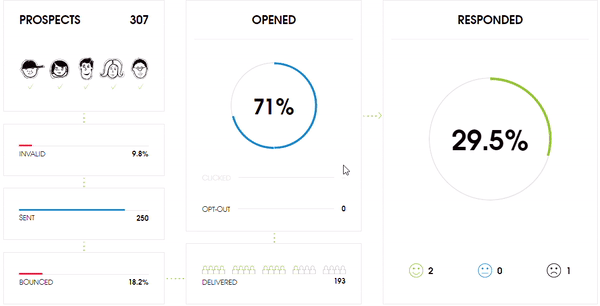
In the infographic, starting from the left you’ll see:
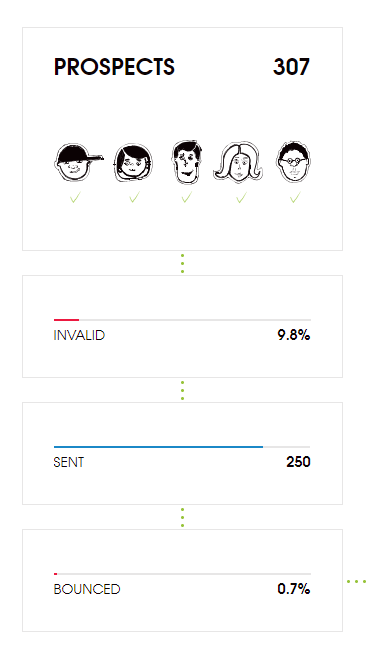
- PROSPECTS – How many prospects are currently saved in this campaign
- INVALID – How many email addresses turned out to be invalid
- SENT – How many opening emails (Emails #1) have been sent so far
- QUEUED – how many prospects are in the sending queue, before the opening email is sent to them
- BOUNCED – How many emails bounced.
Next, you’ll be able to see:
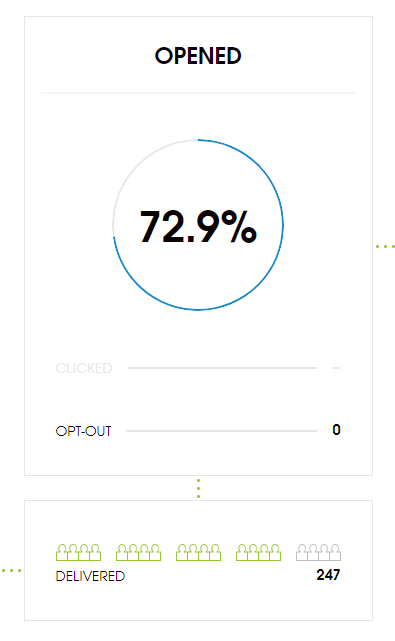
- DELIVERED – How many prospects actually got your message to their inbox
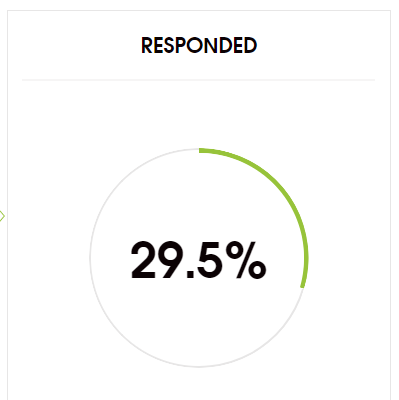
- OPENED – How many prospects opened at least one of your messages. The default number is expressed in per cents, that is: how many of those prospects who actually got your message opened it. As you hover over the percent value, you’ll see the actual number of prospects.
Looking further to the right, you’ll be able to check how many of your prospects’ addresses have responded to your emails so far:
Underneath you can check the interest level of your campaign. These numbers show you the messages you marked as ‘Interested’, ‘Maybe later’ or ‘Not interested’.
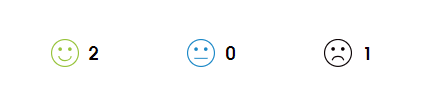
As you hover over the percentages, you’ll see the exact numbers.
Message stats
All the above are statistics considering the campaign as a whole. But you can also check the table below the infographic to see how each of your messages in each Path is doing separately.
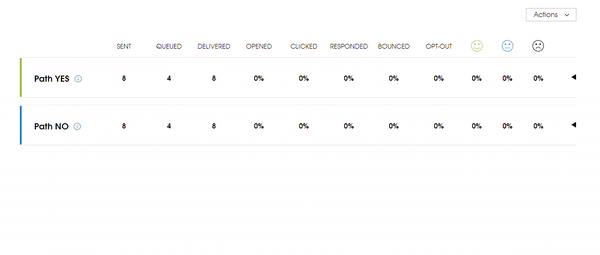
Here you have access to the same types of data as in the general campaign overview (sent, to send/queued, delivered, opened, replied etc.), but with division into separate messages in the sequence.
So, for instance:
- you can assess that the opening email needs improvement in copy or some changes in delivery times, as it doesn’t bring as many replies as you would expect it to;
- you can see that your follow-ups have significantly higher open rates than your opening email;
- you can easily check which of the messages in your sequence brings the most replies, and analyze it to check which part of the message works so well for this particular prospect group. Then, you can improve the remaining parts of your outreach on the basis of your conclusions.
To quickly access the details of each email from the sequence (without editing the campaign), you can click the black triangle next to each message in the table.
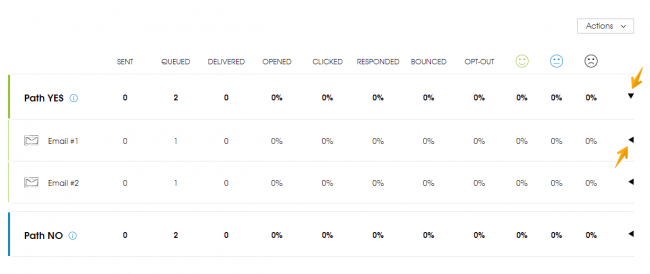
That will show you the preview of the email’s copy as well as its settings considering delivery time and daily limits. All of these affect the open rates and reply rates of your emails.
3. Campaign overview – Prospects tab
The second tab in the Campaign overview, called ‘Prospects’, involves information about all the prospects saved in the campaign and their activities (or lack thereof) in response to your email.
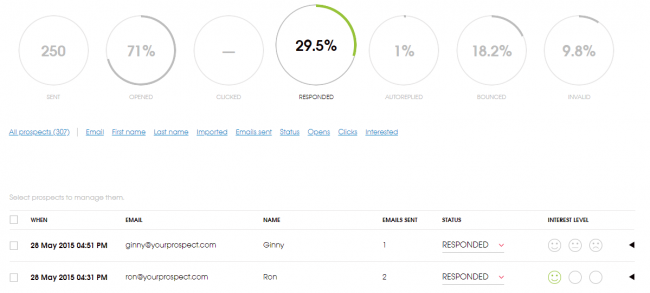
In this one, you can filter those who opened your email or replied to it. Except for statistics, you will be also able to check:
- who exactly replied to your email,
- when they replied, and
- what they wrote.
To see more details about a chosen prospect, click the black triangle on the right in the same row.
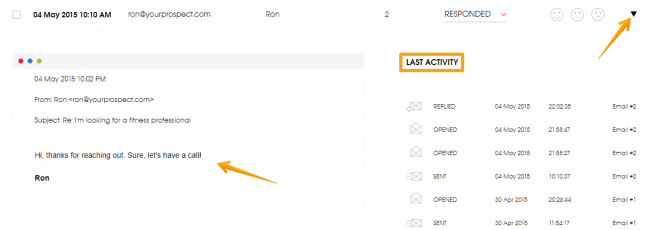
You will see the whole history of all emails sent to and received from the chosen prospect within this campaign. To hide the details, click the black triangle again.
In case you’ve added a condition to your follow-up sequence, here you can check whether a prospect was sent an email from Path YES or Path NO.
There are two more things you can do in this tab:
1. You can change the status of the prospect. For instance if someone replied that they want to be removed from your mailing list, you can change their status to ‘blacklist’. Just click their status field and choose another status.
2. You can select some prospects and export them into CSV file, and from there to your CRM or wherever else you keep your leads’ contacts.

The third tab in the Campaign overview, called ‘To Check’ does not involve any statistical data and is a very interesting topic for another day.
Why are the stats so important?
You can read all the posts, ebooks and forum threads on cold emails there are. You can learn how to write the best copy ever in terms of rules.
But, as we’ve learned, in cold emailing, the theory is one thing and practice may be another. So it may be the case that you address a group of prospects for which your absolutely amazing cold emails won’t work. Then you’ll need to find out what works for them.
And how to find out? You need to send, test, improve, send, and test again. And again. And again. You need lots and lots of practice to make your emails really effective.
That’s why you need statistics – for more efficient and reliable testing of your email outreach. The more you know about what works, what doesn’t, and why – the sooner you’ll be able to draw conclusions and the better you’ll be able to improve your copy and moderate your settings.
It’s so simple and so difficult at the same time. But, as in many other fields, practice makes perfect.
Hope this is helpful. If you have some questions about the features I described here, or any other issues connected with Woodpecker or cold email outreach, give a shout in the comments or email us directly.