This is serious. This is about your email deliverability. I know from my own experience that these acronyms may sound unfamiliar, scary and may seem totally uninteresting. Or maybe they sound familiar, but you never cared enough to check what they really are.
Either way, it’s time to learn a bit about what SPF, DKIM and DMARC are and how to set them up in your DNS records for your mail server, if you want to have better control over your email deliverability. I’ll also show you where in Woodpecker you can check if they are set up properly.
I’ll do my best to explain that in simple words, which will be understood not only by programmers.
What is SPF? How does SPF work?
Simply speaking, Sender Policy Framework (SPF) is a security mechanism created to prevent the bad guys from sending emails on your behalf. The mechanism is all about communication between DNS servers… and this is the point when it all starts to sound scary! But don’t panic. I’ll try to keep it as simple as possible.
Let’s say you’ve sent an email to Bob. But how does Bob’s DNS server know that the email was in fact sent by you? The problem is, it doesn’t really. Unless you have SPF set on your DNS server.
SPF defines which IP addresses can be used to send emails from your domain. So let’s imagine two possible server “conversations”. To make it all easier, let’s assume your name is Mike.
Scenario 1 – You don’t have SPF set up.
Mike’s server: Hey, Bob’s server. I’ve got a new message from Mike.
Bob’s server: Hi Mike’s server. What’s your SPF?
Mike’s server: Yeah, about the SPF… Who cares, really. I don’t have one. Trust me, it’s from Mike.
Bob’s server: If you don’t have SPF, I can’t be sure it was Mike who sent this. Give me Mike’s allowed IPs, so I can compare it with yours.
Mike’s server: I don’t have the list of Mike’s allowed IPs.
Bob’s server: Then I don’t want your message. Delivery denied. Sorry, buddy…
Scenario 2 – You do have SPF set up.
Mike’s server: Hey, Bob’s server. I’ve got a new message from Mike.
Bob’s server: Hi Mike’s server. What’s your SPF?
Mike’s server: There you go, here’s my SPF. There’s a whole list of IPs that Mike himself declared as the ones which can be used on his behalf.
Bob’s server: Ok, let me see… And the message you have for me is sent from IP 64.233.160.19. Ok, it’s on the list. Everything looks fine. Gimme the message, I’ll show it to Bob. Thanks!
My apologies to all tech-savvy readers of this blog for this ignorant oversimplification. Please forgive us dummies, and keep in mind that we do envy you your super-analytical minds.
Anyway, the moral of those two short dialogues is: set your SPF. If you don’t, you risk having your email hacked or spoofed or you may look like a bad guy, and not all your emails will be delivered.
What apps should you include in your SPF?
The general idea is to make sure all applications that send emails on your behalf (and are using their own SMTP, not yours) are included in your SPF. For instance, if you’re using Google Apps to send emails from your domain, you should put Google in your SPF. Here’s Google’s instruction on how to do this.
But it’s important to make sure, if Google is the only app that you should “allow” in your SPF. For instance, we’re using HelpScout customer service software to manage our support emails and MailChimp to send our newsletters. We include both of them in our SPF.
Should you include Woodpecker in my SPF as well?
No. Like I mentioned, you should remember to put into your SPF record the apps that send emails on your behalf, but are using their own SMTP. Woodpecker uses your SMTP to send your emails, so it’s more of an online email client with super powers than a mass email sending app.
That said, the deliverability of the emails sent from Woodpecker depends on the reputation of your domain. Setting SPF and DKIM will help you protect the good reputation of your domain, and thus improve the deliverability of your emails.
How to set up SPF record on your server step by step?
The first step is to check what is your current SPF record. You can do that using tools like:
When you type in your domain there (for instance I would type in woodpecker.co), the tools will run some tests and show you your current SPF, or a notification that it hasn’t been set yet.
What are the next steps?
Depending on your domain host, the steps will differ. Basically, it’s about pasting a properly structured line of text in the right place in the console.
For instance, if you are using Google Apps to send all emails from your domain, the line would look like this:
“v=spf1 include:_spf.google.com ~all”
The “v=spf1” part of the record is called the version, and the ones that come after that are called mechanisms.
Now let’s see what each part means exactly.
- v=spf1 this element identifies the record as an SPF
- include:_spf.google.com this mechanism includes mail servers that are authorized servers
- ~all this one indicates that if an email is received from an unauthorized (not listed in the “include:” mechanism) server, it gets tagged as soft fail, which means it can be let through, but could be flagged as spam or suspicious.
But if you’re using more apps than that (for instance something to send your newsletter, something to send your support messages, etc.), the line will be a bit longer, because you will have to include all the other apps in it. Or if you don’t use Google Apps but a server from another host, for instance, GoDaddy, the line will look different.
Here’s how to set up SPF for the most common domain hosts:
Or you can watch this step-by-step guide in which we explain how to do it:
If you’re currently using or testing Woodpecker and you’re not sure if your SPF is properly set, you may check it directly in the app: go to SETTINGS > EMAIL ACCOUNTS > click the gear next to your email > DOMAIN CHECK-UP (on the left-hand side) or contact us at [email protected] to get some individual help.
What is DKIM?
DomainKeys Identified Mail (DKIM) standard has been created for the same reason as SPF: to prevent the bad guys from impersonating you as an email sender. It’s a way to additionally sign your emails in a way that will allow the recipient’s server check if the sender was really you or not.
By setting DKIM on your DNS server, you’re adding additional way to tell your receivers “yes, it’s really me who’s sending this message”.
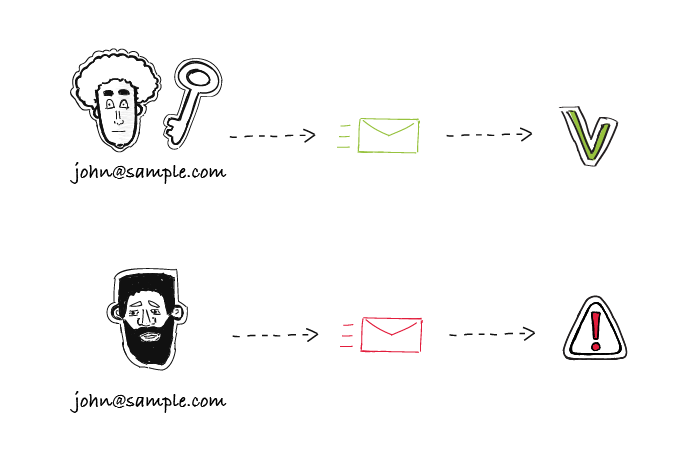
The whole idea is based on encrypting and decrypting the additional signature, put in the header of your message. To make that possible, you need to have two keys:
- the private key (which is unique to your domain and available exclusively to you. It allows you to encrypt your signature in the header of your messages.)
- the public key (which you add to your DNS records using DKIM standard, in order to allow your recipient’s server retrieve it and decrypt your hidden signature from the header of your message).
Take Game of Thrones to get the bigger picture of DKIM. Ned Stark is sending a raven with a message to king Robert. Everyone could take a piece of paper, write a message and sign it Ned Stark. But there’s a way to authenticate the message – the seal. Now, everyone knows that Ned’s seal is a direwolf (that’s the public key). But only Ned has the original seal and can set it on his messages (that’s the private key).

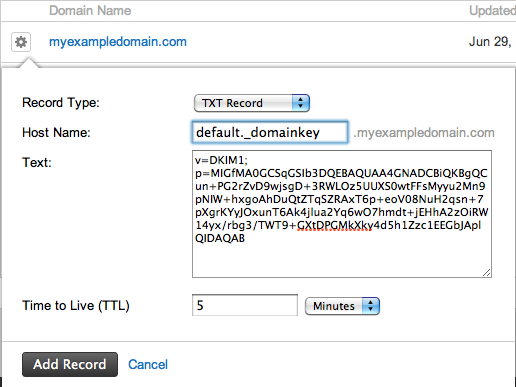
Setting DKIM is just putting the information about the public key into your server’s records. It is also a txt record that needs to be put in the right place.
Once you have set that up, each time someone gets an email from you, the receiver’s server will try to decrypt your hidden signature using the public key. If it succeeds, this will additionally authenticate your message and in result increase the deliverability of all your emails.
How to set up DKIM record on your server step by step?
First, you need to generate the public key. To do that, you need to log in to your email’s provider admin console. The next steps may differ depending on your email provider.
If you’re using Google Apps to send your emails, here’s a step-by-step instruction. Google Apps email users, you should know that on default the DKIM signatures are turned off, so you need to turn them on manually in your Google Admin console.
When you have the public key, you take the generated txt record and paste it in the right place into your DNS records.
Finally, you need to turn on email signing to start sending emails including your signature encrypted with your private key. Here’s how to do it, if you’re using Google Apps to send your emails.
Here’s how to set DKIM in some of the other domain hosts:
For more details, watch a video guide that explains how to do it:
If you’re currently using Woodpecker and don’t have an IT person to ask for help with SPF and DKIM settings, you may contact us at [email protected] for some individual help.
If you’d like to check if your SPF and DKIM are set up properly, you may do so in the app. After logging in to Woodpecker, go to SETTINGS > EMAIL ACCOUNTS > click the gear next to your email > DOMAIN CHECK-UP (on the left-hand side).
Set up SPF & DKIM and improve your deliverability
If you’re sending lots of emails, whether it’s for marketing or for inbound or outbound sales, the reputation of your domain is crucial and you should take really good care of it. You don’t want your domain to get on a blacklist and your emails to end up in spam. Setting SPF and DKIM records properly on your DNS server is a necessary step towards the security of your domain and high deliverability of your messages.
Setting it up may seem complicated, but it’s undoubtedly worth the effort. If I were you, I’d go to my Woodpecker account and check if my SPF and DKIM are properly set right now or ask my IT guys to do it (if you’re not a Woodpecker user). And if it turned out that the answer is “no”, I’d ask them to help me out. And I wouldn’t let them to fob me off. Not with this one.
Check also these four posts on email deliverability:
- What Can We Do to Boost Our Cold Email Deliverability? >>
- Why We Set up a Separate Mailbox for Outbound Campaigns? >>
- Answers to 8 Frequently Asked Email Deliverability Questions >>
- 14 Deliverability Checks to Carry Out Before Sending Your Cold Email Campaign >>
What is DMARC?
In a nutshell – it’s an email security measure that protects your domain against being used by the bad guys and gives you better control of your email deliverability. It’s based on the SPF and DKIM mechanisms.
The bizarre-sounding acronym stands for Domain-based Message Authentication, Reporting and Conformance. What does THAT mean, though?
DMARC allows you to conclude if an email you got was legitimately sent by the person who claims to have sent it. That’s the authentication part.
If the email doesn’t pass the DMARC test, it will be handled in line with the DMARC policy that has been set by the receiver (I describe it in detail later on in the article). That’s the conformance part.
DMARC also makes it possible for the receiver to send reports to the sender, describing how the message was handled: was it let through to the main inbox, did it end up in a spam folder or was it rejected. And that’s the reporting part.
All in all, DMARC allows email receivers to check if the incoming email matches with what they know about the sender. And if it doesn’t, it tells the receivers’ servers what they should do with such a message.
It’s not set up by default – you need to do it yourself if you want to put an additional email security measure on top of your SPF and DKIM mechanisms.
But why is it important?
Why does DMARC matter?
There are three reasons why DMARC is so valuable for email users:
1. It’s a safety measure.
On the sender’s end, it protects your domain against unauthorized use, e.g. by phishers who try to steal your personal information this way. On the receiver’s end, it makes it harder for fraudulent email to go through to your main inbox.
DMARC protects against domain spoofing, aka when somebody who isn’t allowed to use your domain tries to pretend they’re you or that they work at your company to trick someone into believing they’re you. They do it to steal personal data, such as login details or a credit card number.
2. It helps you to better control your email deliverability.
Another perk of employing DMARC is that you’ll be able to better control how many of your emails are considered legitimate and get to your recipients’ main inboxes. And if someone’s trying to impersonate you and send emails on your behalf, but I’ll come back to that in a bit.
3. It protects your brand reputation.
If someone’s pretending to be you and trying to trick people into giving them money or some personal info, it reflects badly on your brand. DMARC helps to avoid that.
DMARC is published in the DNS by the domain owner, alongside SPF and DKIM. It’s a simple one-line record.
Here’s an exemplary one:
v=DMARC1; p=none; rua=mailto:[email protected];
How does DMARC work?
DMARC specifies what has to happen for the message to go through to the inbox, and what will happen if the conditions aren’t met.
When an email is being tested by DMARC, 4 things might (or should) happen:
- DKIM pass – the additional signature put in the header needs to be validated: the private key matches the public key published in DNS.
- DKIM alignment – the parent domain matches the Header From domain.
- SPF pass – the receiving server will take the domain included in the Envelope From address and check for an existing SPF record (and it checks if the IP address is included in the SPF record).
- SPF alignment – the domain in Envelope From matches the domain in the email’s Header From.
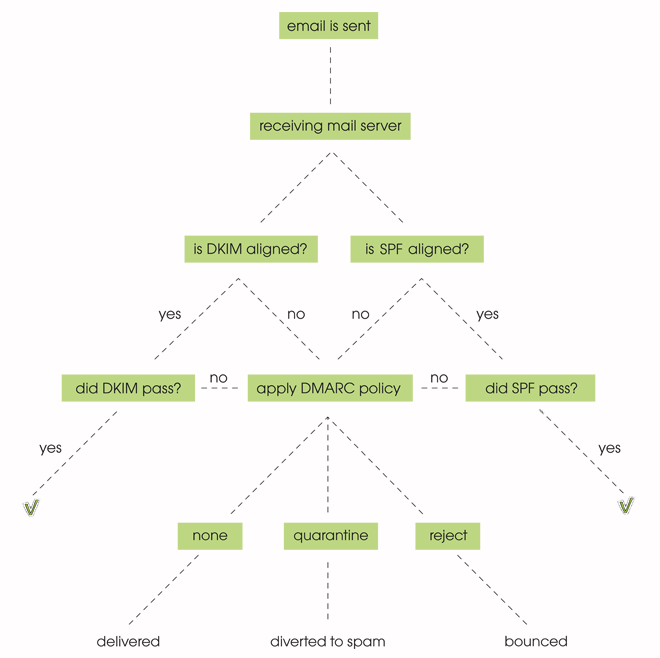
A message will fail DMARC if it fails both SPF and DKIM.
Keep in mind, though, that if you forward a message, only the DKIM stays aligned.
Wait, but aren’t SPF and DKIM already used to protect email?
The SPF and DKIM mechanisms both work to protect against unauthorized use. The thing is, though, that they work in isolation. There is no one universal law to say what the receiver should do when those fail. Every receiver handles such failed messages differently. So for example, one receiver may redirect it straight away to the junk folder, while another will put it to some additional tests to determine where it should go.
Not to mention the domain owner never gets any info about his emails and if they reached the recipient’s main inbox.
DMARC allows us to define our own rules on how to handle an email that doesn’t comply, reducing the risk of our domain being spoofed.
It also allows us to report back to the sender.
Adding a DMARC record to DNS will allow you to set rules for the incoming emails: should they be quarantined, rejected or let through?
DMARC policies and reporting
There are three possible DMARC policies:
- None
- Quarantine
- Reject
In email this means that with a ‘none’ policy all the emails will go through, even if they don’t pass the SPF and/or DKIM test. With a ‘quarantine’ policy set up, the ones that don’t pass will be redirected to the spam folder. And with a ‘reject’ policy, they’ll bounce.
A couple days after you publish a DMARC record in DNS, you’ll start getting reports from ISPs. Those will include stats about all emails sent from your domain (including those that claim to come from your domain).
If you see more emails than you’ve really sent, this means someone other than you is using your domain. The report will give you a clear overview on where the emails come from and if they’d be halted by a “quarantine” or “reject” policy.
These reports will allow you to assess the health of your outgoing messages. What elements do they include? How the messages were handled (in line with the DMARC policies that have been set up), IP addresses that have used your domain to send emails (as well as how many messages have been sent), and SPF and DKIM results.
The reports can be read with a tool such as Postmark or dmarcian.
How to set up DMARC?
- Set up SPF and DKIM
First things first: you need to make sure your SPF and DKIM records are set up. If you’ve thought about your deliverability before, chances are you’ve already crossed that off your list. - Generate a DMARC record, e.g. here.
For now, choose the ‘none’ policy for all emails. - Add your DMARC record to DNS
- Modify the policy according to data as you go
Analyze several reports that you get and once you know how to maneuver through the DMARC policies, switch from ‘none’ to ‘quarantine’, and later on to ‘reject’.
Over to you
A combination of SPF, DKIM and DMARC is deemed to be the golden trio of email authentication. SPF and DKIM are better known and more widely used. Right now DMARC is more of a nice-to-have than a must-have, but this will probably change in the future as more and more people are setting it up for better domain protection against spoofing and phishing.
FAQ
What is an SPF record and why is it important?
An SPF (Sender Policy Framework) record is a type of DNS record that specifies which IP addresses are authorized to send email messages on behalf of a domain. It is important because it helps prevent phishing attacks and ensures email authentication, reducing the likelihood of emails being marked as spam.
How does domain-based message authentication work?
Domain-based message authentication works by using DNS records to verify that email messages are sent from authorized servers. It involves protocols like SPF, DKIM (DomainKeys Identified Mail), and DMARC (Domain-based Message Authentication, Reporting, and Conformance) to ensure the legitimacy of the email sender.
What is DomainKeys Identified Mail (DKIM) and how does it enhance email security?
DKIM is an email authentication protocol that adds a digital signature to email messages. This signature is verified by the receiving mail server to ensure that the email has not been altered during transit and that it is from a legitimate source. This enhances email security by preventing email spoofing.
Why are DNS records important for email authentication?
DNS records are important for email authentication because they store information about which IP addresses are authorized to send emails for a domain. Records like SPF, DKIM, and DMARC help verify the authenticity of email messages and prevent unauthorized use of the domain for sending emails.
What role do IP addresses play in SPF and DKIM?
IP addresses play a crucial role in SPF and DKIM by identifying the mail servers that are permitted to send email messages on behalf of a domain. In SPF records, specific IP addresses are listed to validate the email source, while DKIM uses cryptographic signatures linked to domain-specific IP addresses.
How can a domain owner set up SPF records?
A domain owner can set up SPF records by adding a TXT record to their domain’s DNS settings. This record should include a list of authorized IP addresses or email service providers allowed to send email on behalf of the domain. The SPF record helps in verifying the sender’s legitimacy and preventing email spoofing.
What is the purpose of an email service provider in email authentication?
An email service provider (ESP) facilitates email delivery and ensures that the email messages comply with authentication protocols like SPF, DKIM, and DMARC. They help manage DNS records, provide necessary infrastructure, and ensure that emails are not marked as spam, enhancing overall email security.
How can SPF authentication help prevent phishing attacks?
SPF authentication helps prevent phishing attacks by verifying that incoming email messages are sent from authorized IP addresses. If the email originates from an unauthorized source, it is either rejected or marked as suspicious, thus protecting recipients from potential phishing attempts.
What are DNS TXT records and how are they used in email authentication?
DNS TXT records are text-based records in the DNS system that store various types of data, including SPF, DKIM, and DMARC configurations. These records are used in email authentication to specify which servers are permitted to send emails on behalf of a domain and to validate the integrity and authenticity of email messages.
Why might email messages end up in the spam folder, and how can SPF, DKIM, and DMARC help?
Email messages might end up in the spam folder if they fail authentication checks, are sent from unauthorized IP addresses, or contain suspicious content. Implementing SPF, DKIM, and DMARC protocols helps ensure that email messages are authenticated and come from legitimate sources, thereby reducing the likelihood of them being marked as spam.
READ ALSO

Cold Email Deliverability: There Is Still A Lot to Learn – Webinar Recap
Not so long ago, we organized a deliverability webinar, which some of you might have had a chance to watch live. Deliverability plays a crucial role in the effectiveness of cold email campaigns, so no wonder it’s such a hot topic. Our Woodpecker Team Members, Margaret and Mike, talked about three layers of deliverability: technical settings, email copy, and campaign settings in Woodpecker. In today’s blog post, we answer the 8 top deliverability questions that were raised during the webinar.
What is DNS? How Does It Work? – Short Guide for Beginners
Are you worried you won’t get what DNS is all about because you’re not a tech-savvy person? Well, neither am I. It’s for other people like me that I did my best to get to the bottom of this topic and explain it in plain English, as simply as possible. So set your worries aside and dig in.

How to Set up a Domain and Mailbox for Cold Outreach?
When you’re getting ready to start sending cold emails, the first thing you should do is set up a separate domain and mailbox that you’ll use only for cold outreach. This is a necessary step mainly for your domain’s safety reason, but also it allows you to handle the responses from prospects more effectively because they won’t mix with other business emails you receive. So without further ado, here's a nutshell guide on how to correctly set up a separate domain and mailbox for cold emailing.

