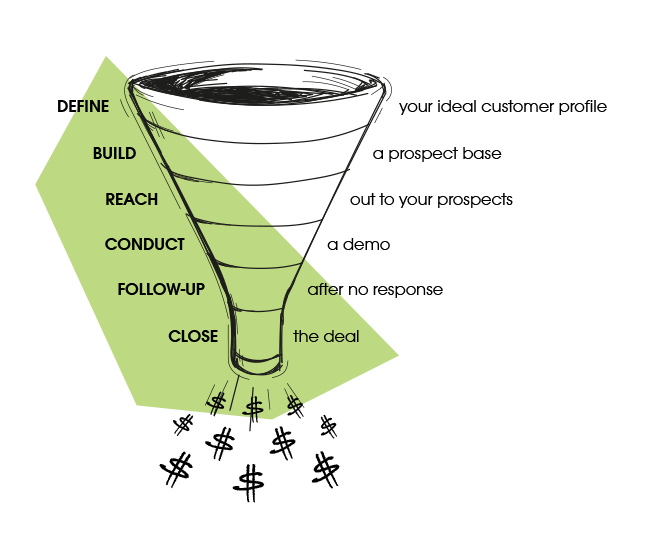
In business, nothing can be left to chance. Otherwise, you won’t make much progress. When it comes to sales, in order to turn more leads into customers, you need to set your internal guideposts that will make the whole process more effective. That’s what a sales pipeline is at its core.
Let me show you how to build a sales pipeline from scratch following this six-step tutorial, or watch the video:
STEP #1 Define your Ideal Customer Profile
This is the starting point of building an effective outbound sales pipeline. Without having a clear picture of who your ideal customer is, you won’t be able to distinguish which prospects are a good fit for your product or service. To do that you need to ask yourself for whom your product will have the greatest value and who has the biggest success potential using it. Why do these two conditions matter the most?
Customers who see the real effects of your solution will make it an integral part of their workflow and may buy additional services from you as they grow. Also, such successful customers will eventually become loyal advocates of your brand who are willing to spread the word about it in their business niche, share a testimonial or leave a review.
Dig deeper into what “Ideal” Really Means in the Ideal Customer Profile >>
I realize defining the ICP may be a tricky thing to do in the early days of your business. In such a case, there are two approaches you can take: back-engineering method and competitor analysis.
In the back-engineering approach you take a closer look at who your current customers are, even if you have just a handful of them. Write down the details about their business, analyze their needs and pain points. You can also interview them to get deeper insights.
Find out how we did it: Who Are Really My Prospects? – Our Way for Persona Development >>
Competitor analysis is a good idea when you have no customers yet. Check whose testimonials your competitor share on their website or who left them a review and build your ICP based on your findings.
Here’s one more important thing to remember about the Ideal Customer Profile. Keep in mind that you need to review your ICP every now and then to keep it up-to-date, because as your company develops, your ICP may change a bit too.
Step #1: check.
STEP #2 Build a prospect base
Prospecting is the pre-qualification stage of your sales pipeline. In outbound sales, the qualification criterium is your ICP. Can you see now why without a clearly defined ICP it would be difficult to build an effective sales pipeline? The ICP is the foundation for all your further efforts.
So how to create a high-quality prospect list?
Basically, there are 2 ways to do it:
- in-house prospect list building, and
- outsourcing.
There’s also another, dark-side-of-the-force kind of way – buying a ready-made prospect list. However tempting it may seem, don’t take this path. Such lists usually contain hundreds or thousands of unverified and sometimes non-existent email addresses. Sending emails to such inaccurate email addresses is a straight way to having your email address, domain or sender ID blacklisted by your email provider.
Let’s get back to the safe methods of prospect list building. Which one is a better choice?
The answer is: it depends. Outsourcing the process is a time-saving option. An experienced SDR will take the most laborious and mundane part of the job for you, which is especially important for teams with limited capacity. You will get a list of high-quality prospects ready to be moved further down your sales pipeline. The main con is the high cost of this solution, which may be a serious barrier for fresh companies.
What about doing prospecting on your own? The advantage is that since the research is done by your team, you get deeper insights into who your prospects are. As a result, you will be able to prepare a more targeted campaign with a prospect-centered copy that hits the right chord. However, manual link building may not be easy to scale up. You may not be able to get hundreds or thousands of leads per week. In this case, it’s a matter of quality over quantity.
Nonetheless, in-house prospecting may be the way to go for you if you want to build your sales pipeline from scratch. Researching your potential customers will help you understand more about their business, workflow and processes. That’s crucial for managing and optimizing your pipeline further on.
Where to look for B2B prospects?
LinkedIn is probably the first place that comes to mind when thinking of B2B contacts. While it’s definitely a rich and most popular source of business data, it’s not the only one. There are at least 15 other places on the web worth checking, such as G2Crowd, Clutch or Quora.
Check our list: 15+ Places Where You Can Find B2B Leads, Other than LinkedIn >>
While searching the above platforms, you’ll come across company profiles and rarely the individual contacts. To acquire the contact information of the decision-makers from those companies, you need to dig a bit deeper. For example, you can do a manual search through their websites or using some prospect list building tools, such as these or use LinkedIn Sales Navigator.
What data to gather while prospecting?
To answer this question you need to think one step ahead and do the prospecting with your message copy in mind. A good idea is to write the copy simultaneously with building a prospect base, so you will be able to better tailor your message to the target recipient.
Pay attention to any info that would help you personalize your email. Apart from collecting the basic info, such as first name or company name, be on the lookout for some ice-breakers. For example, you can mention an article on their blog that you found interesting, or congratulate them on their recent job promotion.
Here you will find some more ideas for advanced personalization:
What Mail Merge Custom Fields Can I Use for Clever Outreach? >>
Step #2: check. Let’s move on.
STEP #3 Reach out to your prospects
By now you should have your prospect base and perhaps also the first draft of your message ready. Take your time to polish it up. Make sure it’s logical, coherent, grammatically correct, doesn’t sound salesy, and what is most important, brings value to the recipient. Writing an engaging and persuasive sales email is quite an art to master. For a good start, follow this 6-step tutorial.
A cherry on top of your sales message is a spot-on CTA that is in line with the goal of your campaign. In sales, it’s usually a call invite or demo signup. You can propose a meeting time upfront or link to your calendly so they can book a time that suits both parties. This option is especially useful when you target international prospects and time difference comes in your way. If you target a narrow group of local prospects, you may want to ask for their phone number for further contact.
Check the following blog post for some examples of a well-structured CTAs:
Perfect CTA, or How to Write a Persuasive Email? >>
If you’re stuck at hello, you may be tempted to use one of the ready-made templates available on the web. That’s a shortcut that may not pay off, though. Think about it: it’s almost 100% sure that you are not the only person who came up with the idea to use the very same template. Your prospects might have already seen it before. That ruins your first impression. Instead, treat the templates as inspiration – something to put your mind on the right track. Take a critical approach to them, just like we did in our 15 Email Templates ebook.
Step #3: check.
The prospects who showed their interest or signed up for a meeting with you move to the next stage of your pipeline. And what about those who didn’t respond? Follow up with them. I’ll share more about following-up in step #5.

STEP #4 Conduct a demo
A demo is the second-level qualification stage in your outbound sales pipeline. At this point, be ready to face your prospects’ objections and answer all their questions. During the demo, you will find out whether your prospect is actually interested in and willing to buy your product or service.
The two most common sales objections you should get yourself prepared for are: price and readiness to buy. You should have a strategy on how to overcome them in accordance with your business goals. One way to do that may be by offering a time-bound discount to trigger the purchase.
Sometimes, however, delaying the purchase decision results from other factors: for example an insufficient budget or no decision-maker currently in charge. In such cases, put the leads on hold for now and reach out to them after some time, for example, next month or quarter.
This brings us to…
STEP #5 Follow up after no response
There may be various reasons why some prospects didn’t reply to your message or you didn’t hear back from them after the demo. They might have simply forgotten. Or they still aren’t ready to make a purchase. Either way, it’s a good idea to send them a follow-up message, because according to our research, as many as one follow-up can boost your campaign’s reply rate by 22%. That’s definitely worth the effort.
A follow-up email shouldn’t be just a mere reminder that a prospect hasn’t replied to you yet. This approach won’t get you anywhere because people hate being nudged and put under pressure. Instead, focus on adding value and overcoming their sales objections. You can do that for example by sharing a relevant customer case study or a knowledge source that will boost your credibility and position your company as a subject matter expert.
You’ll find more actionable tips and advice in our Sales Follow-ups Guide. Click here to download it.
Managing the sending and following up manually is tricky to scale. Sooner rather than later you will start losing track of who you already replied to and who to follow up with. As you grow your outreach, you may feel the need to automate the process but still keep it as personalized and human-like as possible. That’s exactly what we went through until we came up with Woodpecker.
Here’s how follow-up automation helped us manage cold outreach >>
Steps #4 and #5: check.
STEP #6 Close the deal
Time for a great finale. Fortunately, in your follow-ups, you overcame all the possible objections your prospects might have had. They finally signed the contract or entered their credit card data. Congratulations! You’ve acquired a new customer.
With each deal, either closed or lost, you’ll gain new experience that will help you improve your process and make it more effective in the future. Treat each success and failure as a precious lesson to draw conclusions from.
Back to you
These six steps are a basic outline for building a sales pipeline. It’s the starting point for you to customize and optimize it to match your workflow best. Keep in mind that mastering outbound sales takes time and there are no shortcuts to the top.
If you’re a first-timer at outbound outreach, put your mind to verifying and polishing up your ICP, because the pre-qualification stage of your pipeline has a direct impact on the final number of closed deals. Once you nail this step, keep working on improving the other stages until you reach satisfactory results.
READ ALSO

Account Based Sales Development 101: What Is It? How Does It Work?
If you're doing outbound sales, you've probably heard about the ABSD (Account Based Sales Development) trend lately. Is it new? Is it for everyone? Is it a revolutionary approach that will bring you $$$ as soon as your sales team adopts it? What is it, really? Check out the short introduction to ABSD in simple words.

How to Build a Quality Prospect Base for Outbound: 5-Step Tutorial
In 2016, I wrote around 20 posts about prospecting tools and tactics. I decided to prepare a little synthesis of the prospecting know-how I've shared with you so far. Here's the outbound prospecting process divided into 5 steps.

How to Effectively Manage a Sales Pipeline to Grow Your Customer Base?
A few weeks ago I wrote about how to build an outbound sales pipeline . However, creating a sales pipeline is only one side of a coin. The other one is to manage it effectively, so your customer base keeps growing. The first step to manage your sales pipeline more effectively is to analyze sales reports. A look at your sales stats should give you a hint on where to start. Here’s how you can identify and fix the cracks in your pipeline or remove any possible clogs.

