
Connecting and engaging with professionals on LinkedIn is part of every effective cold B2B outreach. In this guest post, Beth Baxter from our friends at Dux-Soup takes you through the steps to follow to generate and manage leads like never before.
***
It’s no secret that LinkedIn is the top social network for business professionals. Having reached 900 million members in over 200 countries, it is an excellent resource for B2B businesses looking to raise brand awareness and uncover new leads. However, if you’re new to prospecting on LinkedIn it can be difficult to understand exactly how best to harness its potential. Finding your perfect audience and defining your outreach strategy can be daunting, if not highly time-consuming. It’s certainly very easy to waste hours on LinkedIn if you don’t have a clear focus on what you want to get out of it, nor the right strategy of engaging with prospects.
In this guide, we share the strategies and tools to get you on the right track with your LinkedIn prospecting, allowing you to get results fast – all while reducing your time investment.
Our simple 6-step method covers how to find your ideal clients on LinkedIn and target them using Dux-Soup, the LinkedIn automation tool which saves time by automating manual LinkedIn activities. With this method, you’ll soon be spending your time closing deals and growing your business.
Remember that you can try Dux-Soup free for 14 days to see if it works for you.
So, are you ready to get started? Then read on.
Step 1: Set a clear objective
OK, so this may seem pretty obvious, but before we launch into what is really a 5-step process of generating leads on LinkedIn, we need to first highlight that it is really important to set a clear objective for your LinkedIn activity. Doing this will give you something to measure your success against.
Say, for example, you are a recruitment consultant trying to find Sales Director candidates for a job vacancy in the IT sector. Here are some examples of objectives you may set:
- It could be as simple as building your network of 1st-degree connections with Sales Directors in the IT sector. By sending connection requests to these profiles you can expand your network of suitable candidates. Your LinkedIn activity will be seen by your network which can generate passive awareness.
- You may define your objective as identifying Sales Directors that are currently open to job opportunities. If this is the case then you’ll want to send a follow-up message once a prospect becomes a connection, asking if they would be interested in receiving information about this great opportunity that fits their skill set.
- You could go a step further and set your objective as confirmed interview candidates. In this case you’ll want to nurture your target prospects, persuading them that this is a great opportunity for them to explore, and that they’d be crazy to miss out.
What we’re getting at here, is that by setting yourself a clear objective, every action you perform will remain focused towards the relevant outcome and you’ll be less likely to waste time on other LinkedIn activities that distract you away from your core objective.
Step 2: Find your target audience on LinkedIn
So now that you know exactly what you’re trying to achieve on LinkedIn, let’s show you how to find your perfect audience. This is a list of LinkedIn profiles that you can target to meet your objective.
There are a number of different methods you can use to find your target audience on LinkedIn, including:
- Search results
- Lead lists in Sales Navigator
- Alumni
- Employee lists
- Group members
- Post reactions
- Custom lists – pulled in from a 3rd party tool for example.
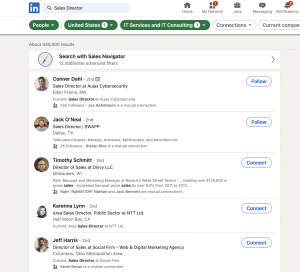
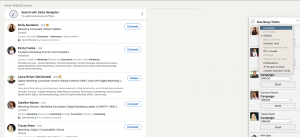
Let’s take a simple search result in LinkedIn to start with. By searching for ‘Sales Director’ and then clicking on ‘people’, we can add filters for ‘industry’ plus select additional filters such as ‘geography’. Here I have gone with the United States and you can see that LinkedIn has come up with 445,000 results.
That’s a lot of profile results so we recommend narrowing down your search further. One way to be more specific is by using Boolean searches. You can find details on how to use Boolean searches to further narrow down your target list in LinkedIn here: LinkedIn and Dux-Soup search and filtering masterclass.
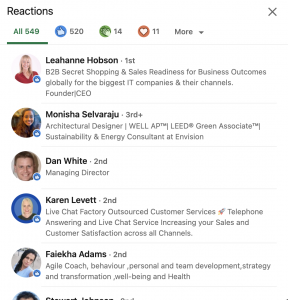
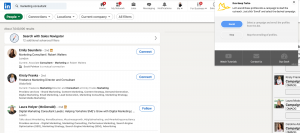
It could be relevant for you to target people that are showing an interest in a specific topic. Did you know that you can create lists of people that have reacted to LinkedIn posts? This is a great little hack to find people that are further down the buying cycle, giving you the opportunity to engage with an ‘in-market’ audience when you run your LinkedIn activity. Check out this example:
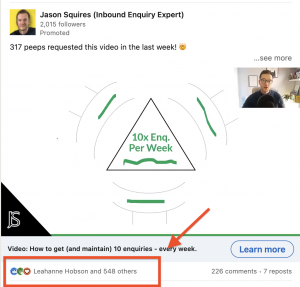
By clicking on the reactions in a post, you’ll see a list of profiles that you can target with Dux-Soup.
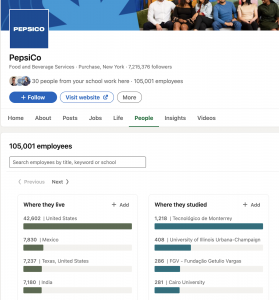
If you’re looking to expand your presence in a specific organization, you can pull up a list of their employees in LinkedIn. To do this, go to the company page and click on ‘people’. You’ll get a list of all employees on LinkedIn associated with that organization. You can narrow down the list of employees using filters like where they live, what they do and how you’re connected.
Finally, if you’re a Sales Navigator or LinkedIn Recruiter user then you can set up Lead lists or use advanced searches that can give you more filter options to generate more tightly defined audiences, which can then be targeted using Dux-Soup. We cover how to use Dux-Soup in the next steps.
Step 3: Define your LinkedIn Campaigns
Campaigns are a sequence of LinkedIn actions executed by Dux-Soup to the lists of profiles you created in Step 2. Campaigns are included with a Free Dux-Soup Trial or a Turbo license and are set-up in the Dux-Dash.
You can create unlimited campaigns with Dux-Soup, allowing you to test different messaging and approaches to your target market. Each campaign can contain up to 12 actions, including:
- Visit profile
- Endorse profile
- InMail
- Connection request
- Direct message (to 1st-degree connections)
- Follow profile
You can also personalize messages using placeholders e.g. FN_ = First Name, which we recommend, as it is proven to increase response rates.
Important advice: Always build your messaging to be appropriate to your target audience. Do not bombard your audience with too many messages in a short period of time. The longer your campaign lasts, the greater your chances of genuine interaction with a prospect.
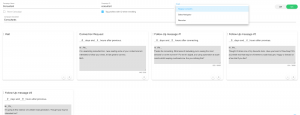
When creating a Campaign with Dux-Soup, start by giving your campaign a name. This also becomes the Campaign ID. By ticking the box to ‘Tag profile with ID when enrolling’, when you enroll profiles into your campaign, Dux-Soup will automatically tag that profile with the ID.
This is a really handy tool for going back and finding profiles should you want to enroll them in another campaign, or send some new content to them.
You can choose to enroll profiles into campaigns using Regular LinkedIn, Sales Navigator or Recruiter to keep all your messages in one place too.
Coming back to your objective for just a minute, remember that your campaigns should be created with the purpose of fulfilling your objective:
- If your objective is to grow your network then you may just choose to visit a profile, send a connection request, and visit again 2 days later.
- If you want to generate leads, then you should add follow-up messages after your connection request is accepted.
You can set a custom time delay for Dux-Soup to perform each action after the previous step has been completed.
Dux-Soup will remind you of the character limits you have to play with – 300 for a connection request and 3000 for a direct message.
And there you have it, once your campaign is built, you’re ready to enroll your list of profiles.
Step 4: Enrolling profiles into Campaigns
Enrolling profiles into campaigns is now pretty easy. Just bring up your list and opt for one of the following two methods:
1. Manual enrollment. The benefit of this method is that it allows you to hand-select the profiles that you want to enroll into a campaign making it more targeted. Once you have your search list, the Dux-Soup Tricks widget will appear. Simply select the campaign option you want to enroll the profile into and click ‘Enroll’.
2. Automatic enrollment. If you’re happy to enroll your entire search list to a campaign then you can do this in a single click of a button. Just head to the Dux-Soup extension and click ‘Enroll’. You’ll be asked to confirm the Campaign you wish to enroll them into.
And that’s the hard work done. You can now sit back and watch your network grow and responses come in. Once a prospect has responded to you, we suggest that you take the conversation manually in order to stand the greatest chance of converting them from here.
You can watch all of this explained in video format. How to get started with Dux-Soup in 5 simple steps.
Step 5: Multi-channel outreach strategies
If you want to use LinkedIn as a part of a multi-channel strategy, for example sending emails and LinkedIn messages from a single workflow then this is also possible. In fact, multi-channel strategies help you to engage with prospects across more mediums, increasing response rates.
Woodpecker Sales Assistant offers a direct integration with Dux-Soup allowing you to create campaigns that will send emails and also carry out LinkedIn activities in the same workflow.
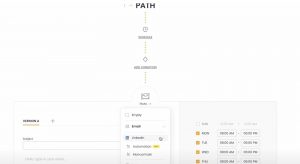
You can set your outreach activities to be via email, or via LinkedIn automations. The LinkedIn automation can be sending connection requests, visiting profiles, or sending direct messages. These actions are carried out from Woodpecker, powered by its integration with Dux-Soup.
We asked Kacper Floryn, Woodpecker’s Business Growth Specialist, how combining LinkedIn activities and actions helps him improve the performance of his cold email campaigns.
“I’ve found that when I visit my prospects’ LinkedIn profiles, the response rate of my cold emails is much higher than campaigns without any LinkedIn interaction on my part. I schedule the first email to go out one day after I visit my prospect’s profile and I see a higher response rate after the first email, where usually the response rate is the worst after the first message.
Now, thanks to the integration, you can scale these campaigns and get much better results.”
In order to do this, you’ll need a Woodpecker Sales Assistant license and a Dux-Soup Turbo license.
Summary
If you’re looking to scale your lead generation, then providing your target audience is active on LinkedIn, you can use this low-cost, low-time approach to engage with them. We advise testing your audience with different engagement strategies, including a multi-channel approach to see what works best for you. Over time, you’ll find that you benefit from a consistent flow of opportunities into your sales pipeline, resulting in sustainable business growth.