
If you’re on LinkedIn, you’ve probably sent some invitations to connect.
Did you write a custom note or take the easy way out and went with the default one?
And how about the connection requests you got?
Were they personalized?
And if they weren’t – did you accept them?
In this blog post I’m taking a look at how to send a LinkedIn connection request to someone you don’t know to get them to connect.
I’ll also show you how you can use Woodpecker to make your outreach easier across channels.
Why should you personalize a LinkedIn connection request?
A default invitation rarely works on LinkedIn.
It sends a signal that you were either too lazy or didn’t care enough to make it relevant to the person you want to connect with. And if you don’t bother to make an effort, why would they?
Leaving the copy as is reeks of the “spray and pray” approach from a mile away. It won’t get you very far.
Even though it might seem unnecessary to personalize a LinkedIn connection request, don’t dismiss the difference a well-thought out note coupled with a personalized video created using an AI video editor can make in the number of accepted invites, don’t dismiss the difference a well-thought out note can make in the number of accepted invites.
Wouldn’t you be more willing to accept a connection request with a note that looks like it was written specifically for you? I know I would.
What to say in a LinkedIn connection request to get an “accept”
Recently, LinkedIn limited the number of connection requests you can send to 100 per week. That’s one more reason to put more thought into the invites.
But you don’t have to bend over backwards and come up with revolutionary ideas to write an effective connection request.
Just remember that a perfect LinkedIn connection request should be:
- professional
LinkedIn is a business platform, so while there’s no need to be formal and never crack a joke, don’t swing to the other side either – stay professional.
- relevant
Let them know you’re not sending connection requests at random. Show them why you decided to connect with them specifically.
- personalized
If you’re using Woodpecker, you can use snippets to easily personalize a connection request with the data you’ve collected about your contacts in the PROSPECTS table. Just remember to keep them short – the character limit for a note is 300.
With a personalized note, your invitation will be more effective, but there’s one more advantage it gives you: it keeps your LinkedIn account safe.
Just like with email, users on LinkedIn might report your messages as spam. And if many users of the platform do so, you will get blocked.
Again, there are no official resources on how many reports it would take, so it’s better to be safe than sorry.
Examples of a personalized LinkedIn connection request
LinkedIn’s goal is to make it easier for you to build business relationships.
And although LinkedIn can build more trust than a cold email at a first glance – as the person you’re reaching out to can easily look up your profile – keep in mind you’re still contacting someone that you don’t know.
Since you’re reaching out to a stranger, you need to give them a really good reason to make them want to connect with you.
Check these examples for some inspiration:
Praise the recipient
{{First_Name}}, I saw you speak at {{Snippet_1}}, and I think you hit the nail on the head when you said that {{Snippet_2}}. Would love to connect with you here on LinkedIn and maybe exchange insights about it some time.
Point to shared interests/approach
Hey {{First_Name}}, a while back, your post appeared in my feed. It was the one about {{Snippet_1}}. I’ve read many of them since, and I can tell we have a lot in common, like {{Snippet_2}}! Would you like to connect?
Ask a specific question about their business
Hi {{First_Name}}! I read an interview in which you talked about how {{Company}} {{Snippet_1}}. Those are impressive results! I’m also in finance. Would you mind sharing how you were able to do so well?
Be bold and genuinely excited to connect
Hi {{First_Name}}, we haven’t met, but I see you and I both are in {{Industry}}. Isn’t it marvelous to be a {{Job_Position}}? Let’s connect and chat about {{Snippet_1}} some time!
Mention a mutual connection
Hey {{First_Name}}, I checked your profile because of a mutual connection – {{Snippet_1}}. I have to admit, I’m quite impressed seeing what you do at {{Company}}. Would you like to join my network?
Now that you know what to say in a LinkedIn connection request, see how you can include reaching out on Linkedin as a step in your Woodpecker campaign.
Make outreach across channels easier with LinkedIn tasks
Recently we’ve introduced a new type of manual tasks in Woodpecker, dedicated to help you reach out to people on LinkedIn. I went into details in this blog post.
They help you with finding contacts on LinkedIn, and serve as reminders to perform a LinkedIn action at a certain step of your campaign.
Keep in mind that tasks are handy reminders that some kind of manual action needs to be taken at a given point, but you still have to perform the action yourself.
This has one big advantage. You see, LinkedIn has a very strict 3rd party tools policy. If you’re using a tool that you shouldn’t, your account might get blocked. But since Woodpecker doesn’t connect directly to your LinkedIn account, using it won’t get you into trouble.
To try LinkedIn tasks, you need the Advanced Campaigns add-on. Or you can sign up for a trial and test them for 7 days for free:
Here’s how you can include a LinkedIn connection request in your Woodpecker campaign:
1. To create a LinkedIn task, go to your campaign edit view. The first step will be by default set as email. To change it, click on the dropdown menu and choose LinkedIn.
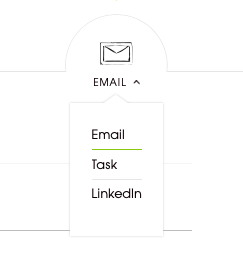
The third option, task, is a regular manual task, i.e. – a reminder of any other type of manual action you set for yourself.
You can start your campaign with any of these 3 options.
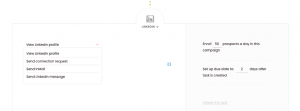
2. Now, choose Send connection request.
3. Next, type in the message you want to include in your invitation. When it’s time to do the task, you’ll have the message ready to be copied.
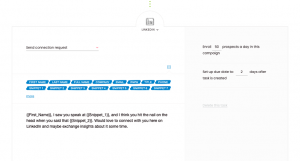
See how I used snippets there? Snippets in tasks work the same as in emails: once your campaign is active, they turn into pieces of information you included in your PROSPECTS table.
4. If you add a link to a contact’s Linkedin profile in the PROSPECTS table, a View LinkedIn profile notification will appear in the task.
You can add a link by:
- Importing it from Google Sheets (natively integrated with Woodpecker)
- Using the Woodpecker + Hunter native integration
- Using the LinkedIn Lead Gen Forms + Woodpecker integration (via Zapier)
If you haven’t added a link, Woodpecker will still help you out.
It’s going to generate a LinkedIn search link based on at least two pieces of data: the first and last name of a contact. Make sure you also fill the Company field for more accurate results.
In this case, you’ll see a Find LinkedIn profile notification.
Thanks to Woodpecker, you now have easy access to a prospect’s LinkedIn profile.
When you click on a link, Woodpecker will open your LinkedIn account – the one you’re currently logged into.
An exemplary campaign
Since you know how to set up a LinkedIn task, here’s what an exemplary flow could look like:
- An opening email
- A follow-up email
- Then, set a condition to the follow-up, e.g.:
- if a prospect opens your email more than 3 times, the path will move onto a manual task – e.g. call a prospect
- if they don’t meet the condition, the path will go to a LinkedIn task with the Send a connection request option
Both LinkedIn tasks and regular manual tasks give you the opportunity to increase the chances of closing a deal and make reaching out easier if you’re using multiple channels.
Log in to your Woodpecker account or sign up for a free trial to test it for yourself:
FAQ
1. How can job seekers use LinkedIn messages to make valuable connections within the same LinkedIn group?
Job seekers can use LinkedIn messages to make valuable connections by sending personalized invites to members within the same LinkedIn group. A quick introduction mentioning a recent post or discussion that was pretty thought-provoking can serve as a great speaking point. Expressing genuine interest in the other professional’s career path or sharing how their insights have impacted your own situation can foster a meaningful connection.
2. What are a few tips for crafting LinkedIn invitations that stand out to professionals in your desired career path?
A few tips for crafting standout LinkedIn invitations include personalizing each invite with the recipient’s name, mentioning any mutual connections, and referencing specific details that relate to their professional network or interests. Highlighting a shared experience, such as attending the same networking event or participating in the same LinkedIn group, can also make your invitation more compelling. Additionally, expressing your admiration for their work or contributions to discussions can help establish a positive initial impression.
3. How can professionals stay up to date with open positions and industry news through their LinkedIn network?
Professionals can stay up to date with open positions and industry news by actively engaging with their LinkedIn network. Following companies of interest, joining relevant LinkedIn groups, and connecting with other professionals in their field allows for a flow of information and job alerts directly through their feed. Regularly interacting with posts, sharing articles, and publishing content related to their career path can also prompt others in their network to share opportunities and updates.
4. Why is it important for professionals to regularly send LinkedIn invites to expand their network, especially after networking events?
It’s important for professionals to regularly send LinkedIn invites, especially after networking events, to maintain and expand their professional network. Connecting on LinkedIn after meeting in person or attending the same event helps solidify the relationship, making it easier to stay in touch, share opportunities, and bounce ideas off each other. Expanding your LinkedIn network can also open doors to new career opportunities, valuable connections, and insights into industry trends.
5. How can engaging in discussions within a LinkedIn group benefit your professional development and networking goals?
Engaging in discussions within a LinkedIn group can significantly benefit your professional development and networking goals by exposing you to new ideas, industry trends, and potential mentors or collaborators. Active participation demonstrates your knowledge and interest in your field, making you more visible to other professionals and potential employers. It also provides an opportunity to connect with individuals who share similar interests or career paths, thereby expanding your professional network with meaningful connections.
6. What strategies can professionals employ to effectively use LinkedIn messages for networking and exploring career opportunities?
Professionals can employ several strategies to effectively use LinkedIn messages for networking and exploring career opportunities, such as personalizing messages with specific details about the recipient’s experiences or posts that resonated with you. Offering something of value, like sharing an article relevant to their interests or introducing them to a mutual connection, can also enhance the interaction. Being clear about your intentions, whether seeking advice, discussing open positions, or simply wanting to connect over shared interests, helps set the tone for a productive conversation.
7. How can mutual connections on LinkedIn facilitate introductions and help build your professional network?
Mutual connections on LinkedIn can facilitate introductions by serving as a bridge between you and professionals you wish to connect with. Requesting a mutual connection to provide a quick introduction can lend credibility and increase the likelihood of your invite being accepted. Additionally, browsing mutual connections’ networks can uncover valuable contacts you may not have discovered on your own, providing an opportunity to expand your professional network with relevant and potentially influential individuals in your industry.