
I get it. You’ve connected your email address, wrote an outstanding email sequence, uploaded a long list of verified prospects and conducted a 5-minute campaign audit to check if everything’s right, but Woodpecker has sent very few of your emails so far. Let’s go through all the steps together and discover what can be improved to boost your sending.
This article is tightly connected with our sales automation tool. To reap the full benefits of boosting sending, log in to the app and go through the steps with me.
We’re going to learn how to increase the number of emails that Woodpecker sends daily, yet without going over your email host sending limits and staying safe. If you need to send more than your email provider’s limitations, invest in an external SMTP.
Are you in the app? Let’s proceed. What are the two quick tricks that can help you use Woodpecker to its full potential while keeping your domain safe and sound?
#1. Expand sending windows for a steady email volume
Having read our ebook on email deliverability, you must have noticed the importance of widening sending windows while scheduling a delivery time to keep a consistent flow of emails. This is especially important when you run more than one campaign at a time.
A. What are sending windows?
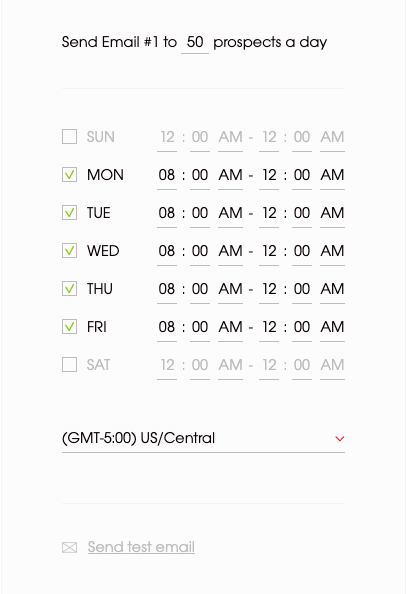
Sending windows could be defined as delivery time frames set by the sender (that is you) within which messages go out of Woodpecker. Since sending windows concern an individual campaign’s delivery time, you can set them up while creating or editing a campaign in Woodpecker. Every time you make a new campaign, you need to choose sending windows.
How to pick the right sending windows? First of all, set up larger sending windows than you first intended to make sure Woodpecker has enough time to send all your emails. Otherwise, your sending will be delayed. Therefore, give the app the appropriate time to send messages. And avoid one-hour sending window unless you have almost 35 prospects in your campaign.
What happens if you don’t set the windows up? Woodpecker will send messages 24/7, i.e. 24 hours each day of the week (including weekends).
 Woodpecker sending windows
Moreover, as you can see above, you have an option to choose a day and a time span of your sending, as well as adjust the time zone to match the one you want to send messages in. If your prospects and you are in the same time zone, set the time windows to your office hours, so you can easily respond once you get a reply.
I encourage you to A/B test the best time window to reach out to your prospects. It takes a lot of trials before you know for sure what the optimal sending time is to get the most opens. And it may differ from one target group to another. So you may be forced to run a new test every time you change the niche you’re targeting.
Note: Delivery times require your utmost attention if you’re sending several campaigns at the same time. More on that later in this blog post.
Summing up sending windows are for
- scheduling the sending of a cold email campaign
- matching the sending time with the appropriate time zone
- giving Woodpecker a time frame for contacting a defined prospect count
B. How to keep a steady email volume?
The other thing you need to consider is that you need a regular email flow to keep your domain reputation safe lest you get blocked. Because once you compromise your domain reputation, it’s hard to regain it (yet not fully impossible).
Some of you may be wondering what I mean by a “regular email flow”. Well, when you send cold email campaigns, you need to keep the sending at a pretty steady rate and avoid peaks in your sending. Since spammers send messages inconsistently, an irregular sending activity alarms SPAM filters and thus reflects negatively on your email deliverability.
If you wonder how to check your sending volume, we use Talos to keep track of our sending frequency. The tool is also useful in checking the IP and domain reputation.
Here’s an example of an irregular email sending volume:

Here’s what you should aim at regarding sending volume:
As you can see the sending is steady in the second screenshot. There’s no peak and throughs in your email sending. It proves that you’re an active email account user and not a spammer.
How to schedule Woodpecker to keep a steady email volume?
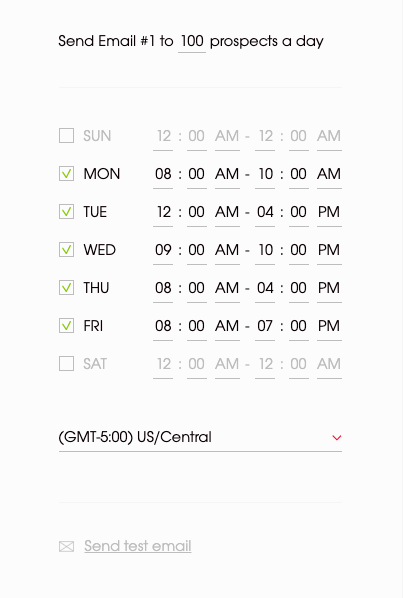
Let’s say you want to keep a steady email volume and that is your sending schedule:
Woodpecker sending windows
To my mind, those are quite uneven sending intervals for a single campaign.
How to keep a steady email volume? Let’s assume that this is your schedule. Do you have a chance of keeping a steady email flow with sending windows like that?
Woodpecker sending windows
With the default sending limit up to 40 emails per hour, and 8 hours available for sending, 8:00 AM – 4:00 PM, you will send around 320 emails each day (8 hours for 40 emails).
What if you want to send more than that? Can you send more than 320 emails a day without changing your sending windows? Of course, you can. See this.
#2. Raise mailbox sending settings to send multiple campaigns
The other Woodpecker sending hack involves mailbox sending settings. It’s useful for those of you who manage a handful of campaigns at once but have only one email account connected to Woodpecker.
Mailbox sending settings help you boost email sending per email account. If you have multiple email accounts at Woodpecker, you can set up mailbox sending settings for each mailbox separately. Go to ‘Settings’, click on ‘Email accounts’ and choose ‘Sending’ from the menu on the left. You should see this section.
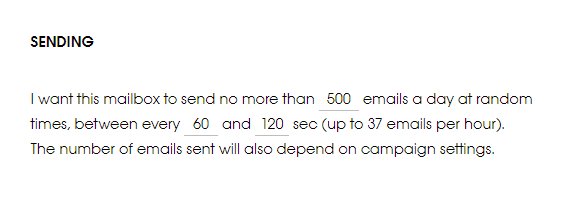
Sending settings in Woodpecker
What does it mean? It means that the email account you picked can send up to 500 emails a day. Let’s say you have three active campaigns in Woodpecker. Campaign A sends 50 emails daily and the two other campaigns send 300 emails per each. You want to send 650 emails in total. Thus, you need to increase email sending limits to 650 (providing that you don’t go over the daily sending limit of your email host and that you set up appropriate sending windows).
The default daily email sending limit isn’t the only thing you can raise in the mailbox sending settings. The other thing is the time intervals between sending each email. As you know, Woodpecker sends emails randomly to mimic the way a human being would send emails.
By default, Woodpecker takes between 60 and 120 seconds to send an email. You can change it but before you do it, please note that the limit exists for a reason. It’s meant to keep you safe from going over quota and blocking your email account.
Before you increase it do those three things:
- check your email provider’s sending limits
- read the article How Your Emails & Follow-ups Will Be Sent by Woodpecker >>
- download the Deliverability 101 ebook to learn how to optimize cold email campaigns.
The minimum value for the sending interval is 10 seconds; there is no maximum value. So if you want your messages to go out faster, lower the sending seconds (10 seconds is rather risky unless you have an external SMTP).
What’s in it for you?
Here you go. Those are two useful sending hacks that may transform your campaigns. Yet, use them wisely. Think twice before you decide to increase the sending limits.
It may appear to be a good idea at first, but then if you consider the sending limit o your host, your deliverability and much more. It becomes less appealing. Bear in mind that you can always connect another email account to Woodpecker if you need a boost.