
Right now, people from over 52 countries are using Woodpecker. They use many different email providers next to the most popular ones, such as Gmail or Outlook. You may have noticed a change in the app when you were trying to connect your email to Woodpecker not so long ago.
Today, I want to share with you why we’ve made those improvements, what you gain from them, and how to set them up. Let’s start.
Why we improved the way you can connect your email?
A new way of connecting email offers you much more than just a fresh-looking UI. The main reason behind the upgrade is to give you more possibilities and a far greater control over sending and deliverability.
An advanced email connection
One of the major improvements is an option of an advanced email connection. You can connect an external SMTP and IMAP to Woodpecker.
You can add an external SMTP service
As you know from one of the previous posts, SMTP is a protocol used to send your emails. When you set up an email account at major email providers, they use their own SMTP to send your email by default.
And that’s that. You don’t need to worry about how your emails are being sent.
Similarly, when you connect your email to Woodpecker through an automatic integration, Woodpecker sends email using your email provider’s SMTP services.
From now on, you can connect an external SMTP service in the app to send your email.
Using an external SMTP grants a greater influence on the way your emails are being sent and delivered. And if you’re sending cold emails in behalf of your clients, you may avoid deliverability troubles.
Check out the last blog post about using an external SMTP and its effect on deliverability >>
Previously, you had to contact our support team to learn how to do that. Now, connecting an external SMTP is much quicker and simpler.
You can add a custom configuration of your IMAP
In the same way you may use an external SMTP to control your sending, in the advanced path of connecting email, you can also define which IMAP you want to connect to Woodpecker. This may be useful for instance if you wish to receive replies at a different address than you send your emails from.
And those of you who are more advanced email senders are able to connect several SMTP services to one IMAP.
Faster connection with your email account
A new way of connecting email saves you a great amount of time. All steps you need to take are in one place.
You don’t need to set up SMTP first, and then go somewhere else in the app to set up your IMAP service. The whole process is a matter of a few clicks.
Greater awareness of your sending limits
In the previous posts, you’ve learned how important it is to keep email sending in check and how to influence deliverability.
Get to know 14 deliverability checks to carry out before sending your cold email campaign >>
Read step-by-step guide to a campaign that gets delivered >>
We’ve worked out some solutions to help you in that.
You get informed about your provider’s sending limits
You’re informed about 24-hour sending limit set by the email provider you have your email account at. You can use that information when scheduling a new cold email campaign, and plan out your sending accordingly.
Learn email sending limits of various email hosts >>

As you see, a hint about sending limits in blue pops up. Woodpecker sets the same sending limits on your email account to keep it safe from being banned.
You can always increase the limit. Just go to ‘Settings’, ‘Email accounts’, then click on your email address, and scroll down to ‘Sending’. You can manipulate the numbers there. Keep in mind that you will face deliverability issues if you increase the limits.
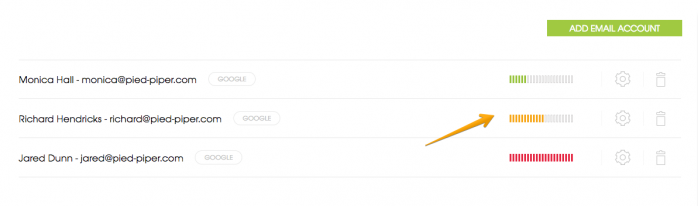
You see a progress bar next to your email address
Next to your email account, there’s a progress bar that fills out proportionally to the number of emails sent a day. When you’re close to your sending limit, it changes its color to yellow. When you’re about to cross (or already crossed) your limit, it’s red.
By hovering over the progress bar, you’ll see the exact number of emails you’ve sent so far on a given day.
This allows you to efficiently monitor sending of your email campaigns. You don’t need to crunch the numbers yourself. Everything is represented visually. Take a look:
How to set it up?
Let’s proceed to the app.
Already have an account at Woodpecker.co and want to see how to connect an email account? Log in.
Don’t have an account yet, but curious about how to connect an email anyway? Sign up.
Now, when you’re logged in, we can begin a step-by-step guide.
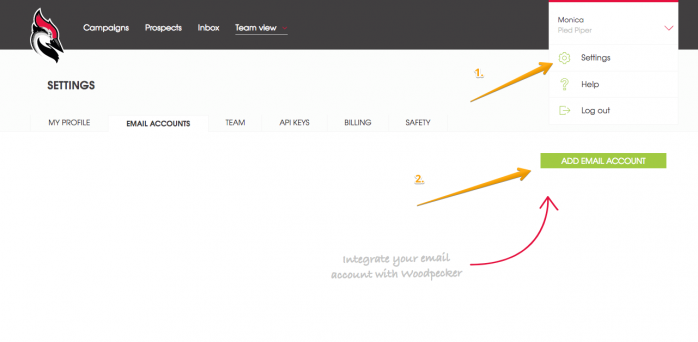
- Go to ‘Settings’ and click on ‘Email Accounts’.
- Click on a green button
- ‘Add Email’Click on your email provider.
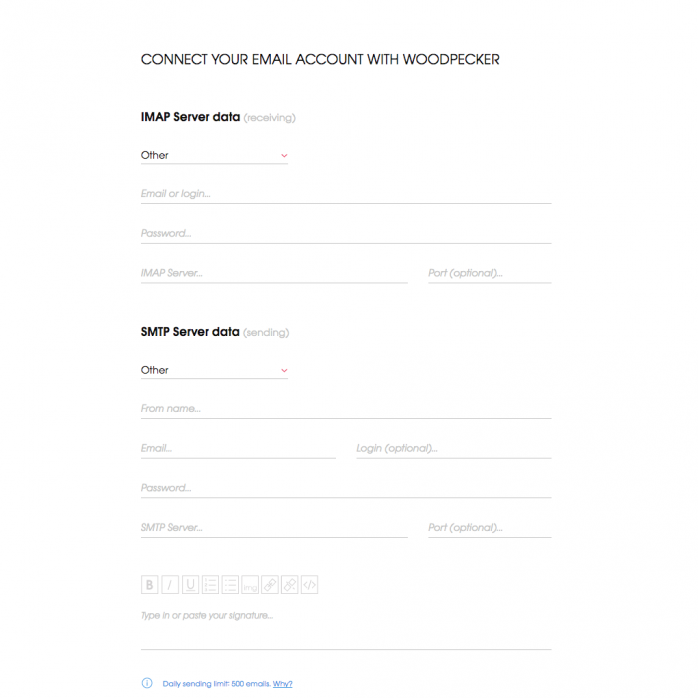
- Choose your type of connection: automatic or advanced.
For a regular email connection, choose ‘Automatic connection’, but if you want to add an external SMTP, choose ‘Advanced’. You’ll be asked to provide this info:
Next, you’ll be asked to set up your signature and from name. This is optional. You don’t have to do that at this point. You can always set it up later in ‘Settings’.
And when you have your email fully connected, check out how to warm it up >>.
What are we working on right now?
We’re planning to add an automatic integration with Outlook and Microsoft Exchange for those of you who prefer those email providers. We are also working on global campaign statistics and expanding campaign possibilities.